Ikea bibs embellished with Alexander Henry's Small World fabric and fun felt scraps. This was for a baby shower gift for my niece Emma. I wish I had gotten a better picture. This fabric is some of my favorite. I've got a Small World quilt for Ivory in the works. Really it's just in the planning stages right now, but I'm pretty excited about it.
Showing posts with label Baby. Show all posts
Monday, December 5, 2011
Small World Bibs
Ikea bibs embellished with Alexander Henry's Small World fabric and fun felt scraps. This was for a baby shower gift for my niece Emma. I wish I had gotten a better picture. This fabric is some of my favorite. I've got a Small World quilt for Ivory in the works. Really it's just in the planning stages right now, but I'm pretty excited about it.
Friday, October 14, 2011
Blessing Cap and Shoes
Hello! It's been a long time since I've posted. I had forgotten that I hadn't finished this post that I started ages ago. I actually made an heirloom! Two of them! Well, three of them, if you count each little shoe separately.
Ivory wore a real family heirloom gown for her baby blessing that many of her female relatives* wore for their own blessing or christening. Including Yours Truly. The various parts of the dress were made by my great-grandmothers, and the slip was even made from a pillowcase belonging to my great-great grandmother. That's Ivory's great-great-great grandmother!
*Ivory's mother, maternal grandmother, great aunt, all her maternal aunts and female cousins, and 3 first-cousins-once removed.
I wanted her also to wear something special and homemade that she would be able to keep as her own. I used some lace and ribbon my mom had lent me to make a blessing cap and tiny shoes.
Isn't she the sweetest? I wanted the cap to be a special heirloom. But that thought was so intimidating that I had to put it aside before I got the courage to start sewing!
Various ideas I doodled before choosing one.
I tightened the ribbon and tied it in a bow to form the cap shape.
Ta da!
Now on to the little shoes...
I literally made these the morning of Ivory's blessing (church doesn't start until 1pm, thank goodness). I made them in the same general manner of the ribbon ballet slippers I made earlier in the year.
They are teeny-tiny! So I only made her wear them once. Twice. It was worth it, though, especially since she gets to keep them! (And since it didn't take me long to make them.)
There you go, Sweetheart.
Sunday, July 24, 2011
Baby Dress
Hi there! It's been awhile since I've posted, but not for a lack of "stuff" to blog about. Does anyone else have a hard time doing everything they want to do? My life story. Anyway, here's a dress I made for Ivory a couple of months ago. It's made from two fat quarters. The fabric is called "Spa" by Rosemarie Lavin for Windham Fabrics.
I copied a dress from Target. Plagiarizing a finished piece of clothing is more interested to me than following a pattern. It was still a bit chilly when I took these pictures, hence the long sleeves underneath the dress.
It turned out a little short, so it's more like a pinafore top. I might add another skirt tier, or at least make a matching diaper cover.
Mmmmmm...grass. And yes, the front of her dress is wet. What can ya do?
Detachable flower pin/clip.
I have plans to make more of these little dresses. Also perhaps a tutorial...?
I copied a dress from Target. Plagiarizing a finished piece of clothing is more interested to me than following a pattern. It was still a bit chilly when I took these pictures, hence the long sleeves underneath the dress.
It turned out a little short, so it's more like a pinafore top. I might add another skirt tier, or at least make a matching diaper cover.
Mmmmmm...grass. And yes, the front of her dress is wet. What can ya do?
Detachable flower pin/clip.
I have plans to make more of these little dresses. Also perhaps a tutorial...?
Tuesday, May 24, 2011
Infant Ballet Slippers
I made these dainty little baby shoes by hand out of ribbons and a bit of elastic. I love the way they look on Ivory. And they weren't difficult to make, either.
First I cut a wired ribbon the length of the bottom of her foot, rounded the toes, and made the heels slightly narrower (it was already the perfect width: about 1.5"). I used wired ribbon because that's what I had, but it wouldn't have to be wired. In fact, I ended up pulling the wires out in the end so they wouldn't poke my baby's feet. Next I cut a piece of ribbon long enough to go all the way around the outline of the foot. Then I singed the cut edges of the ribbon so they wouldn't unravel.
I simply sewed the long ribbon around the edge of the foot-shaped ribbon, with right sides together (actually, I don't know if there was a right and wrong side to these particular ribbons, but you catch my drift). I placed the elastic in the casing as I sewed it. Then I tied and cut off the elastic tails to fit her feet.
After that I stitched the ribbon ties on each side of the shoe (on the inside). I like to be true to the way a real ballerina ties her pointe shoes, but I also like the bow too much to tug in the "piggy tails" instead.
I love these little ballet slippers. I plan to make another pair in white (or should I say "ivory") for Ivory's blessing day.
First I cut a wired ribbon the length of the bottom of her foot, rounded the toes, and made the heels slightly narrower (it was already the perfect width: about 1.5"). I used wired ribbon because that's what I had, but it wouldn't have to be wired. In fact, I ended up pulling the wires out in the end so they wouldn't poke my baby's feet. Next I cut a piece of ribbon long enough to go all the way around the outline of the foot. Then I singed the cut edges of the ribbon so they wouldn't unravel.
I simply sewed the long ribbon around the edge of the foot-shaped ribbon, with right sides together (actually, I don't know if there was a right and wrong side to these particular ribbons, but you catch my drift). I placed the elastic in the casing as I sewed it. Then I tied and cut off the elastic tails to fit her feet.
After that I stitched the ribbon ties on each side of the shoe (on the inside). I like to be true to the way a real ballerina ties her pointe shoes, but I also like the bow too much to tug in the "piggy tails" instead.
I love these little ballet slippers. I plan to make another pair in white (or should I say "ivory") for Ivory's blessing day.
Thursday, March 24, 2011
Newborn Bibs
You know when you spend several minutes getting your baby into clean, fresh, adorable clothes and then—wham!—she spits up all over the front and neck of them and then you have to change her whole outfit all over again? Well, here's a little solution: spit up bibs. Then when she spits up unexpectantly you only have to change her bib!
I made two: ruffled and flowered. I think I need more in several colors!
She started getting fussy so I had to put her pacifier in for the rest of the pictures.
You might recognize the fabric from the Stella Pixie Hat Knockoff (here and here). I needed something to match the cute hat, since all of her clothes are pink.
So here they are, paired together:
See what happened when I pulled the "plug" out?
I made these bibs a few weeks ago but held off blogging them because I never put the fasteners on them. In the meantime I've been using safety pins. You know what? I have no idea when I'll get around to putting snaps or Velcro on them! They are not perfect, but they'll do!
While we're talking about bibs, I'll throw this in:

I just saw this picture of my nephew wearing one of the bibs I gave him. It's fun to see something I made actually being used. What a cutie he is!
I made two: ruffled and flowered. I think I need more in several colors!
She started getting fussy so I had to put her pacifier in for the rest of the pictures.
You might recognize the fabric from the Stella Pixie Hat Knockoff (here and here). I needed something to match the cute hat, since all of her clothes are pink.
So here they are, paired together:
See what happened when I pulled the "plug" out?
I made these bibs a few weeks ago but held off blogging them because I never put the fasteners on them. In the meantime I've been using safety pins. You know what? I have no idea when I'll get around to putting snaps or Velcro on them! They are not perfect, but they'll do!
While we're talking about bibs, I'll throw this in:

I just saw this picture of my nephew wearing one of the bibs I gave him. It's fun to see something I made actually being used. What a cutie he is!
Monday, March 21, 2011
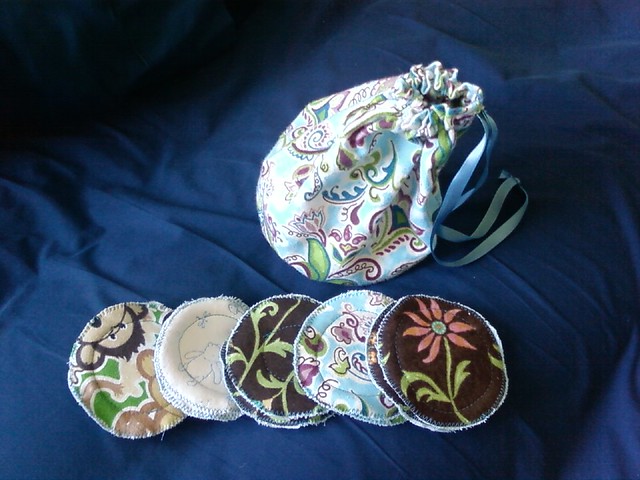
Breastfeeding Pads -Or- What To Do With Old Flannel Blankets
With a newborn baby there's one thing that's constantly on my mind: Breastfeeding. And everything that goes along with it. These nursing pads are lined with layers of flannel from old, ugly blankets on the inside and newer cute flannel on the outside. I actually made these a couple years ago when Lincoln was a baby and now I'm using them again with Ivory.
My favorites are the ones with the pink flowers. The pretty/fun fabric puts a smile on my face when I use them. Why not spice up an otherwise ordinary item? It makes life just a little brighter. Another bonus: these breastfeeding pads soak up more milk than the store-bought cloth pads I have.
Thursday, March 17, 2011
Ribbon Roses (Ribbon Flowers 1)
I realize I have nothing green in this post for St. Patrick's Day today. Lately my life has been taken over by the color pink. It's been loads of fun! I have so much baby stuff to blog about, and pictures to go with it. Unfortunately, those pictures are all on my home computer which is temporarily in storage while we move to our new house. Guess what else is in storage? ALL my sewing and craft supplies. All of it.
Lucky for me I'm at my mom's house while we're between houses. She's been known to have a stash of her own. The last couple days I've been trying out her ribbons and flower ribbon books. My six year old took this picture of me:
(You can see where my wedding ring goes. It still feels too tight to wear comfortably, even though I'm not pregnant anymore. I'm thinking I need to get it resized... Um... Okay, now back to my story.) My son likes to be a part of whatever I'm doing. He looked through a book and picked out a pink rose to make for Ivory to wear in her hair. So I temporarily abandoned the little flower I was attempting so I could help him. Well I ended up spending quite a bit of time on the rose "he" was making, but it was worth doing it together.
All my clips and brooch pins are packed (Did I mention that already?), so we improvised by safety pinning the flowers to Ivory's shirt. These two roses were made from the same pink-to-red wire ribbon.
She is one month/four weeks old today! I love this age.
Next time I'll show you the little pink geranium flower I made, and the black eyed susan that I'll hopefully finish today (kids willing). Now I'm going to go kiss my baby. After I pinch her for not wearing green.
Tuesday, February 22, 2011
My Little Sweetheart
I'd like to introduce you to one of my best creations ever. My little Ivory was born last Thursday and she has been filling my life with joy ever since. She's also been filling all the baby clothes and gear that had been waiting for her.
The Boppy pillow is so much cuter with her on it:
And my childhood American Girl doll looks nothing in the Stella Pixie hat knockoff compared to my real baby doll:
Here's a closeup of the little munchkin:
Here she is cuddled up on the blanket from her brother:
And, just to show that she can open her eyes:
Have a sweet day! Okay, one more picture:
The Boppy pillow is so much cuter with her on it:
And my childhood American Girl doll looks nothing in the Stella Pixie hat knockoff compared to my real baby doll:
Here's a closeup of the little munchkin:
Here she is cuddled up on the blanket from her brother:
And, just to show that she can open her eyes:
Have a sweet day! Okay, one more picture:
Sunday, February 13, 2011
Bibs and Bias Tape
You might be wondering if I went into labor since I haven't posted in awhile after posting so often for a couple weeks. Well, I haven't had the baby yet. I'm not really expecting her to come until the end of this week at the earliest. I still have so much to do!
Anyway, here are some more bibs I made for a friend of mine. She is having her first boy and I'm having my first girl, so we had a combined shower. I really should have made some girl bibs for me at the same time, but that is just how it goes. I suppose soon I'll do another bib post with girly bibs! I like how this bias tape turned out, especially when the polka dots happened to line up right in the middle.
I was thinking I might do a tutorial on making bias tape, since I mentioned it in the post of Sawyer's bibs. Of course, as soon as I had that thought, lo and behold I saw two different tutorials on making bias tape! It's probably better this way. Dana does such thorough and fun-to-read tutorials, so I'll link to hers. She also has another tutorial on applying bias tape. I didn't realize there was more than one way to do this!
From MADE:


Wish me luck with the birth (and on finishing all my projects before then)!
Anyway, here are some more bibs I made for a friend of mine. She is having her first boy and I'm having my first girl, so we had a combined shower. I really should have made some girl bibs for me at the same time, but that is just how it goes. I suppose soon I'll do another bib post with girly bibs! I like how this bias tape turned out, especially when the polka dots happened to line up right in the middle.
I was thinking I might do a tutorial on making bias tape, since I mentioned it in the post of Sawyer's bibs. Of course, as soon as I had that thought, lo and behold I saw two different tutorials on making bias tape! It's probably better this way. Dana does such thorough and fun-to-read tutorials, so I'll link to hers. She also has another tutorial on applying bias tape. I didn't realize there was more than one way to do this!
From MADE:


Wish me luck with the birth (and on finishing all my projects before then)!
Friday, February 4, 2011
New Cover, Old Boppy
With just over two weeks left 'til my due date I'm going into serious nesting mode. Can you tell? Taking all my baby boy things and making them look new and girly! Latest project: Freshen up the Boppy pillow.
One of my sisters commented to me recently that I have a strange baby girl style. I guess she meant that I use green, blue, and brown just as much (or more!) than pink and purple. I have nothing against the more traditional baby girl colors. I just happen to really like green, blue and brown! And who can resist this beautiful floral pattern?
The minky dots on the other side are so soft. I got the idea from a Boppy cover that another sister of mine recently purchased (below). In fact, I used her new Boppy as inspiration for most of this. Aren't the tulips cute?
Her cover has a zipper straight across the top (or bottom?) of the pillow, but I decided to put mine around the back where it wouldn't be seen as much. Also this way it doesn't look upside-down when I choose one side over the other.
You know I love my rick rack! I sewed the rick rack just on one side of the zipper flap, taking care not to sew over the zipper itself. I also added a little handle for easy carrying, as I imagine I will be carrying the pillow up and down the stairs a bit for feeding time.
Just for kicks, let me show you the old Boppy cover I made before my oldest was born. This is the same Boppy pillow! Way back then I covered all my indoor baby gear with this white and blue checked fabric so everything would match in our crowded one-bedroom apartment. This was actually cute for boys' fabric back in 2004! Fabric has come a long way since then. Or maybe now I just know where to shop! (By the way, throwing the Boppy in the washer and dryer does wonders for the fluff level of the pillow, as well as the dust mites.)
I can't wait to see my baby girl sleeping like that!
One of my sisters commented to me recently that I have a strange baby girl style. I guess she meant that I use green, blue, and brown just as much (or more!) than pink and purple. I have nothing against the more traditional baby girl colors. I just happen to really like green, blue and brown! And who can resist this beautiful floral pattern?
The minky dots on the other side are so soft. I got the idea from a Boppy cover that another sister of mine recently purchased (below). In fact, I used her new Boppy as inspiration for most of this. Aren't the tulips cute?
Her cover has a zipper straight across the top (or bottom?) of the pillow, but I decided to put mine around the back where it wouldn't be seen as much. Also this way it doesn't look upside-down when I choose one side over the other.
You know I love my rick rack! I sewed the rick rack just on one side of the zipper flap, taking care not to sew over the zipper itself. I also added a little handle for easy carrying, as I imagine I will be carrying the pillow up and down the stairs a bit for feeding time.
Just for kicks, let me show you the old Boppy cover I made before my oldest was born. This is the same Boppy pillow! Way back then I covered all my indoor baby gear with this white and blue checked fabric so everything would match in our crowded one-bedroom apartment. This was actually cute for boys' fabric back in 2004! Fabric has come a long way since then. Or maybe now I just know where to shop! (By the way, throwing the Boppy in the washer and dryer does wonders for the fluff level of the pillow, as well as the dust mites.)
I can't wait to see my baby girl sleeping like that!
Subscribe to:
Posts (Atom)