Showing posts with label Family. Show all posts

Saturday, October 18, 2014

Mod Podged Halloween Frames

I'm not big on scary Halloween, but I love costumes! Most years we do a family theme (and they're often based on the year's current school theme). We love to look back at all the costumes we've had in the past. This is a great way to display them and decorate at the same time. Inspired by Carrie's Christmas frames here. 


These are made from inexpensive, unfinished craft store frames. I painted the edges of the frames, then Mod Podged them with scrapbook paper. I distressed some of them with stamp pads. There is a frame for every year so we can look back at all the fun Halloween costumes we've had. The year is printed on each photo.


This is how I have the frames set up for this year. I'm working on last year's Halloween photo right now.

 (There's bad lighting in my family room, even in the middle of the day)

I like how the white distressing turned out on this frame. The framed photo is a good example of what to do if you didn't get a great family picture where everyone was smiling and holding still at the same time, as I didn't that year. I just collaged individual photos into one.

Wednesday, December 29, 2010

Homemade Christmas: Canvas Silhouettes (with Tutorial!)

Now that all the gifts have been opened I can share my Christmas projects with you! This year my sister Sadie and I had each other for family gifts.


I made each child a silhouette of themselves, and a combined one for my sister and her husband. After sending off the gifts I was nervous that the kids would be upset they weren't getting toys from me. I'm happy to say that I've only heard good reports, and even my brother in law seems to like them (and he's not a homemade gift kind of guy). What makes this gift fun is that it can really show the personality of each person.


Interested in making one yourself? Here's a quick tutorial:

Step 1: Taking or Finding Photos. As you can see, the pictures don't need to be super-high quality. For these I had my nieces and nephew do fun poses. I got some great action shots of my nephew and some cute poses from the baby, but nothing exciting from the older girl, who was not in the mood for pictures. So I looked back and found a cute picture of her playing in the mud in her swimsuit. Now THAT was a pose with personality! Since she loves wearing skirts I Photoshopped a skirt from a different picture onto the swimsuit one. Ta-da!


Step 2: Photoshopping(Optional). I wanted to see what the finished product would look like before I decided to proceed. So I used my eraser tool in Photoshop to crop around the whole picture to just the person. (It helps if the person is in front of a solid white background so you can use the Magic Wand tool.) Then I made the person a solid color and played around with the fonts until I had it the way I wanted:


Step 3: Printing and Cutting. Print your photo (or Photoshopped image) and cut out the image to make a stencil. I tried using both the white space background and the image as the stencil, but really it just depends on what colors you want for the foreground and background. (For the couple silhouette I actually used both stencils.) Use a small pair of scissors or an X-Acto knife for cutting. Print an extra copy that won't be cut to have on hand for reference, especially if it is a detailed image.


If you're using two people in different colors then cut out each person separately.


Step 4: Grab your Canvas. For the kids I used 8x10" canvases that can be hung straight on the wall. For the couple I found a thin flat 9x12" canvas to fit the frame I already had.

Step5: Stencil Painting. Place your stencil on the canvas. I just held the paper in place with my hand. (I wonder if freezer paper stenciling works on canvas? I'll try that next time.) Instead of mixing paints to get your colors, I suggest just picking a color straight from the paint tube. It just makes touch-ups easier. It's hard to match a mixed color after it's dry. I used acrylic craft paints from a craft store.

For this one I painted the background a solid color and left the person the white color of the canvas. Later I painted over her in cream, but since she was already white I didn't have to paint multiple coats. For the kids' silhouettes I had my own boys help me paint the whole canvas a solid color, then I used the stencil to paint the person on in white. I had to do a few coats since I was painting with a light color on top of a dark one.


If you're doing two people in different colors: let the first person dry, then use your 2nd person stencil:


Step 6: Touching-Up and Names. Touch up any little mess-ups you may have made and paint on the names. I chose to do this free-hand because making a stencil for all those little letters seemed much too tedious!


Step 7: Varnish. With acrylic craft paints you should really put some sort of finish on it. I like to use varnish with a satin finish (instead of gloss). You could also use Mod Podge.


And your done! Okay, maybe this wasn't as "quick" a tutorial as I expected, but hopefully it helps.

I put this one into a frame to make it more elegant, but mostly because I happened to already have a nice frame with no glass. The painting didn't need it! (I left the cardboard corners on the frame since the gift was taking a road trip to California).

Tuesday, January 19, 2010

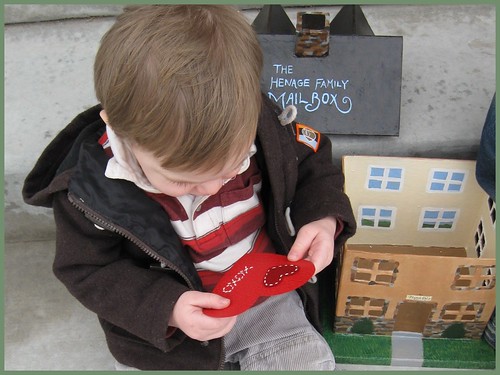
Family Mailbox

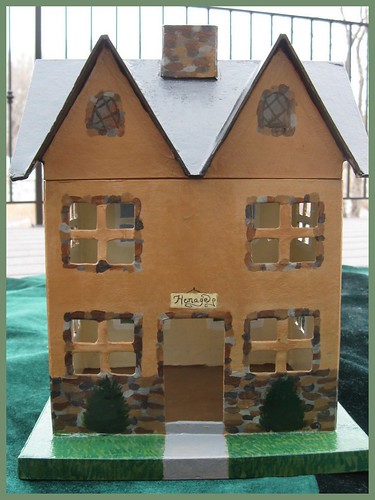
When I was little my mom made us an indoor family mailbox. It looked like a little cottage home with slots on the back for each family member. We sent each other notes and items we had ordered from each other's mail order catalogs throughout the year, but the busiest time for our family mailbox was Valentines Day. A few years ago I bought a paper mache house to make my own family mailbox. Since Valentines Day is right around the corner I thought now would be the perfect time to paint it.


I tried to make the coloring and style look a little like our own house. Wouldn't it also make a fun toy house to play with a little wooden peg family?


What's inside? Two Valentine cards!


I thought the house would be so cute photographed on our front lawn. Then I remembered that it's January and all we have is footprint-covered snow. I tried it on the snow, but the white washed all the color out of the pictures, and my little monkey wouldn't stop throwing snowballs at it. So the Christmas tree skirt and my front porch steps will have to suffice.


I was having a lot of fun painting the jasmine plant climbing up the side of the house. Then it suddenly reminded me of a Thomas Kinkade painting so I immediately had to stop. The other side has a birdhouse and agapanthus plants. Hmmmm... I wonder if it would work to paint flowers on the side of my real house to make it look like I have a garden. Do you think my neighbors would notice?


Here's the before picture. House purchased from Hobby Lobby.


My oldest little monkey and I have already exchanged several letters with each other using our new mailbox. A new (old) family tradition!

Thursday, April 2, 2009

Little House on the Prairie Play Set

Completed December 2008
My family has a tradition of giving ONLY homemade gifts to each other. It started one year when I was eleven or twelve and we were short on Christmas money. We had so much fun giving and receiving homemade gifts that we kept doing it year after year. I think it helps emphasize the giving rather than getting aspect of Christmas gifts, downplays the commerciality (I don't think that's a word, but you understand my meaning, right?) of gifts, and it's a great excuse to get your creative juices flowing. I would say most of the crafting/sewing I do is for family gifts, and a big chunk of that is Christmas. So here's my first (of many) Homemade Phesine posts featuring Christmas presents. Of course, these are all on Flickr already if you can't bear to wait for my blogging.

This gift was probably my favorite gift I made from this past Christmas. It's a Little House on the Prairie play set for my six year old niece, who is really into pioneers right now and loves to read.

 
The Ingalls family with their little house and a handy calico storage bag. The house came from Hobby Lobby, unfinished. It stores flat, which is ideal for mailing across the country.


Baby Carrie, Laura, Mary, Ma and Pa. I tried to make the characters true to the Garth Williams drawings in the books. My four year old laughed out loud every time he looked at Baby Carrie's expression. He helped paint the blue on her dress. I wanted Ma and Pa to be slightly taller than the girls, so I glued stacked wooden disks (for Ma's petticoat) and hearts (for Pa's boots) to their feet.


I thought the bonnets, aprons, and Mary's "golden curls" turned out cute. 

 
Here they are all packed up and ready to go back to the Big Woods.
Posted by Picasa
Related Posts Plugin for WordPress, Blogger...