Showing posts with label Kids Clothing. Show all posts

Monday, January 7, 2013

Leonardo da Vinci Costume

I was just going through my blog drafts and saw that I had never published the rest of our Halloween costumes. Here's the second one. One more to come!


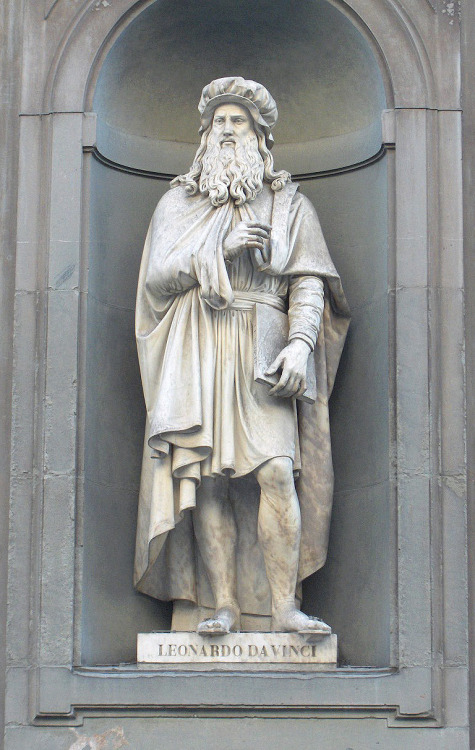
My four-year-old wanted to be Leonardo da Vinci for Halloween and he wanted his little sister to be the Mona Lisa. Here's how his costume turned out. It's based on the sculpture of Leonardo da Vinci in Florence, Italy.


The sleeved cape is vintage--it belonged to my grandmother.


The hat is a large felt circle with stretched elastic zig-zagged to it. If fit just perfectly, but I would have liked it bigger since it shrank in the wash.

For the beard and hair I took a length of fleece long enough to go all the way around the cap (and a little extra, just in case). It's about 8 inches wide (the length of the hair/beard). I left one of the long edges intact and cut strips to about 1 1/2 inches from the edge for the hair portion. For the beard I cut a mouth whole about half and inch from the edge and cut the beard hairs up to about another half inch from the mouth hole. The I sewed the wig to the hat from one ear to the other, leaving the front unattached. It fit snugly to his face, but was a bit stretched out by the end of the night (and covered in candy-yuck!). A few more stitches will fix that when it's needed.


I tied a paintbrush into the hair over one ear.


And here's my handsome Leo. The name tag helped with recognition.

Soon to come: Mona Lisa!

Friday, January 4, 2013

Leonardo Tees

I made these Vitruvian Man t-shirts for the kids for Christmas since we studied Leonardo da Vinci in homeschool. He became somewhat of an icon for us.


I used freezer paper stencils (tutorial on MADE) cut out by my SIL & BIL's handy-dandy Silhouette machine (I think I need one of those... Oh, the possibilities!).


I used the same cut twice - once each for the image and reverse of the image. I like the way both of them turned out. This also helps the kids keep track of their shirts.


I made a few sets of these for cousins, too. I tried doing a few with spray paint instead of fabric medium paint, but it turned out so badly I had to start over. I tried fabric spray paint, too, but I was not pleased with the results. I guess I need more practice. For now I'll stick to the traditional method.


If only we had these shirts when we went to the Leonardo Museum a few months ago!

Tuesday, November 6, 2012

Scarlet Pimpernel Costume

My almost-8-year-old chose to be the Scarlet Pimpernel for Halloween. Sir Percy Blakeney is known for his impeccable fashion taste. I don't think he would have worn rolled-up jeans, but that's okay.


Step One: The Coat - My son tried on several women's coats at the thrift store. This is the one he chose because it's supposed to be "really fancy." He didn't like the solid navy wool coat that I chose because it wasn't fancy enough. I relented because I'm trying to let him make more choices (even though I wouldn't have needed to modify the navy one to fit him!). He knew what he wanted and it was perfect. Or soon would be. Once home, I put the coat on him inside-out and pinned along the underarm seam and down the sides of the coat. He helped with the sewing. After sewing I trimmed the seam allowances with pinking shears. I also turned up the sleeve cuffs. Simple and easy. I even sewed and trimmed right over the pockets! The coat is nice and long on him. He seemed upset when I seam-ripped the shoulder pads out, but I didn't feel like giving in on that point.


Next comes the lace: The jabot (jah-boh), cravat (not pictured, but what is just a rectangular strip of white fabric tied around the neck), and the cuffs (which have elastic on them). I never thought I'd ever buy lace for my son's Halloween costume!


The jabot is made of strips of gathered lace sewn to a trapezoid of cotton (actually, two), then sewn to a ribbon with a velcro closure. This particular ribbon and velcro originally came around the Christmas pajama pants I got the kids from Target last year. Yes, I saved it. Yes, I used it. I think I deserve a pat on the back for that. I just realized that I forgot to make lace and/or buckles for his shoes. Ah well, Halloween is always rushed. I don't think I would have had time, anyway!


I didn't know if anyone would recognize "what" his costume was supposed to be, so I asked Alexander if he wanted me to make him a name tag. He said yes, as long as the writing was fancy enough. Apparently my penmanship met his approval. I used some parchment paper scraps I just happened to have around.


The oversized scarlet pimpernel flower was a cheap-o poinsettia from the dollar store. It used to have seven petals but I cut off two to make it star-shaped and hot-glued the empty spaces together as I was gluing the flower to the name tag. Yes, I also have a stash of brooch pin backs.


The green vest was from an old white rabbit costume that my sister wore in a ballet recital many years ago. I'm glad it didn't clash with the coat. Black trouser socks and dress shoes finished off the bottom half of the costume. The sword helps balance out the masculinity of the costume. Sink me! If only I had time to find a magnifying glass for a chain around his neck.


They seek him here, they seek him there...

Saturday, November 20, 2010

Embellished Tees: A Blast From the (Not-Too-Distant) Past

Since I blogged the Little Green Men shirts recently I thought I'd share some of the other t-shirt projects I've made before. Some of these are in my Flickr photo stream (but aren't showing up because I need to upgrade since I reached my 200 free photo limit). Many of these are done with felt because I love the way it looks. I free-hand painted the Ninja Turtle, but I really want to get into freezer paper stenciling. As soon as I can remember to buy some freezer paper, that is!

You might recognize one or two of these:

Thursday, November 18, 2010

Little Green Men Tees


At the time of the Toy Story 3 movie release I saw that both Target and Disneyland had some really cute Little Green Men t-shirts. The Target tees were almost affordable, but I don't like the way they fit. So I did what I do and I bought some plain shirts to make my own. I've had this project ready for several months now, but I hadn't decided if I was going to use my favorite t-shirt embellishment technique using felt, or if I would branch out and try freezer stencils. Then a couple weeks ago I saw these and decided it was time to go ahead with the project using knit scraps.


These are fun shirts to wear to Disneyland, especially if you're going to meet some of these guys:


And do some of this:


And this:


And, inevitably, some of this (waiting in line):


To make the appliqué I printed out a picture of the green aliens, cut out the head, and used it as a pattern for my fabric (in this case, a green shirt of mine that had a stain, plus some other random knit scraps). I pinned it altogether before I sewed. Then I touched it up with some embroidery. Pretty simple.

I actually did the project when I was in California last month. Two (of my four) sisters and I had a little sewing-pregnant party. Yes, we're all three pregnant! Ashley made baby booties and a Pinocchio costume hat for her son's Halloween costume and Sadie (taking the picture) made curtains and baby booties. Then we stretched out with some pre-natal yoga. That was a fun day. I love crafting together!

Monday, October 11, 2010

Pilot Caps, Goggles & Jackets

*UPDATE*
I have now posted the pattern. Scroll down to the end of this post!


Have a young pilot-in-training in your house? I have two! For homeschool this year my sisters and I wrote a theme called "Soaring Over America." Naturally we needed pilot caps and bomber jackets for the kids to wear.


As you can see, these little aviators are equipped and ready for take off!


These inexpensive flight jackets are made from Walmart hoodies. I wanted them to have a collar instead of a hood, so I modified them a little. I like how the soft, wool-looking lining shows a little more with the collar turned down.


The pilot caps are made from thin vinyl, though they could easily be made from felt as well (I'm thinking kids' party favors for an "Up" themed birthday...)


I lined the caps for extra comfort and so I could use some cute fabric lining. Don't you love the stars?


I made the goggles out of felt with an elastic backing.


I was thinking these also make great superhero masks by themselves, but in the end I stitched the goggles to the caps so they wouldn't get lost. It also helps my two-year-old put them on easier.


(back)

Intrigued? Let me give you a hint. I made the goggles in two layers of felt to help them keep their shape better. I cut out one layer with the felt folded in half so they would be symmetrical, then sewed it onto a rectangle of felt for the second later. Not until I was finished with the sewing (well, minus the openings I left for the elastic) did I cut out the second layer. I've done this with some other projects, too. It's helps out a lot.


By the way, if you're interested in a pattern for the the caps I can post it for you. It took me some tweaking to get it the way I wanted it. I don't mind sharing. Especially with Halloween coming! *UPDATE! Pattern posted below*

I made simple initial patches for one sleeve and sewed wings patches onto the other sleeve. The idea is that the kids will earn more patches throughout the year. I even have a genuine air force wings pin for them to earn. I'm excited for that one.


Don't these look fun all ready and waiting for the boys to find them in the morning? The different colored felt and lining helps the boys easily tell which cap belongs to which kid. No fighting over them!


You can bet these will be doubling as Halloween costumes! I even made an extra cap for myself. Hmmmm... Amelia Earhart or Anne Marrow Lindbergh?


PILOT CAP PATTERN
The pictures below are set up so you can easily print each on 8 1/2 x 11" paper. Cut out each picture, overlap them, then tape them together for the pattern. My kids have small heads (as do I), so you'll want to add some seam allowance. I suggest first sewing up a test cap in scrap fabric and adjusting it until you have the right fit. Use felt for a simple, quick cap, or use vinyl and a cotton lining for a fancier one. Feel free to comment or email me with questions. Maybe in the future I'll make it into a full tutorial.


Monday, February 1, 2010

Boys' Dress Pants


February is Celebrate the Boy month over at MADE and Made by Rae! And I have a little surprise... You just might see me hanging around at MADE in a few days... Something involving a little tutorial I'm doing. In the meantime I thought I'd blog this pair of pants I made last month. They fit with the Boy theme, don't you think?


I call this kid Monkey, but I think he might be part giraffe. Monkey One recently went through another growth spurt. I had been meaning to sew him a new pair of dress pants for quite some time, as the hem of his old pants was creeping higher and higher up his ankles. I was making him wear his cowboy boots to church every week to hide the problem. One Saturday night I decided I couldn't take him to church one more time in those high-water pants. So at 9:45pm I dug into my fabric stash and started cutting. A few hours later I had these.


To keep things simple I left off the pockets. For the waistband I wanted a smooth front and an elastic back. But, as I always do, I started to complicate things: "Oh, it won't be too hard to add some pleats in the front" "I should just stitch around the front here to make it look like it has a fly" "I'll add this button on real quick just for looks" and so on. But in the end I was glad I added those complications and left off the pockets. The waistband took me longer than I thought it would. One of these days I'll keep that in mind while I'm budgeting my time.


As a pattern I used an old pair of dress pants I had made him for a wedding almost two years ago. Was it really that long ago? I can't remember what pants I used as a pattern for those. Since Monkey One only grows up and not out I kept the width almost the same, but made them six inches longer. Yes, you read that right. Six inches. (Please note that he has had other dress pants since that wedding. One pair he'd already outgrown. Another pair had been ruined in an incident with his female cousin involving pink nail polish, but he would have outgrown those, regardless. His other pair, which were almost too casual to wear to church in the first place--and were also seemingly shrinking--were in the laundry.)


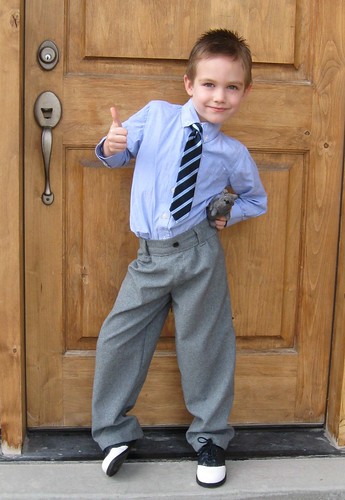
The pants are just a tad too long. Can you see him stepping on the hem as he knocks on the door? But don't worry. I won't be surprised if he grows more and I have to let the hem down by July!

Saturday, November 28, 2009

In Honor of Thanksgiving

Here are the Native American costumes my kids and I made for homeschool. We used a Simplicity "Historic" pattern for these and costume fabric from JoAnn. I couldn't tell you what tribe they are supposedly representing, but I still think the costumes look cool, regardless. Plus the boys love wearing them.

I had them wear their costumes for Thanksgiving, and took these pictures on our post-feast walk. We've actually had the costumes since early October, but I hadn't gotten a picture of them yet.

It was impossible to get both kids smiling at the same time. It was really bugging me that my oldest little monkey was covering his mouth for the only picture where my little one smiled.


The view here is so pretty. That's Utah Lake and Mt. Timpanogos in the background, on the left.


Monkey One


Monkey Two


Related Posts Plugin for WordPress, Blogger...