Showing posts with label Felt. Show all posts

Monday, December 17, 2018

Hairpin Tin

A spiffied-up Altoids mints case to hold my daughter's bobby pins and hairpins for ballet. This will make my life so much easier! This will go in her Christmas stocking, so shhhhhh!

I free-handed the embroidery on felt. Other tools: my good ol' pinking shears and trusty E-6000 glue.


Monday, January 7, 2013

Leonardo da Vinci Costume

I was just going through my blog drafts and saw that I had never published the rest of our Halloween costumes. Here's the second one. One more to come!


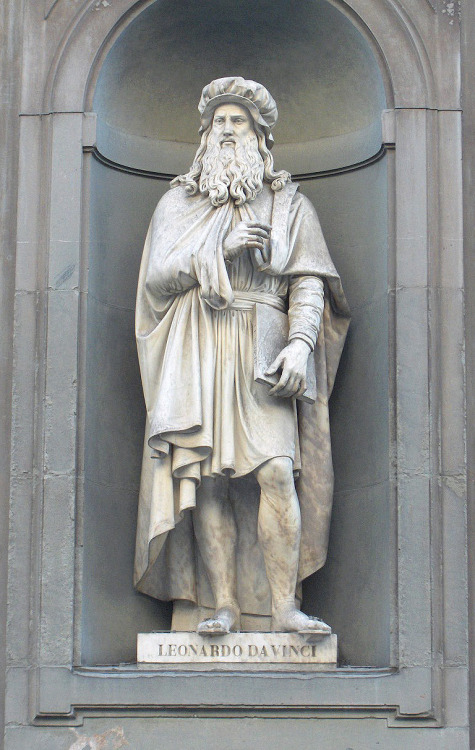
My four-year-old wanted to be Leonardo da Vinci for Halloween and he wanted his little sister to be the Mona Lisa. Here's how his costume turned out. It's based on the sculpture of Leonardo da Vinci in Florence, Italy.


The sleeved cape is vintage--it belonged to my grandmother.


The hat is a large felt circle with stretched elastic zig-zagged to it. If fit just perfectly, but I would have liked it bigger since it shrank in the wash.

For the beard and hair I took a length of fleece long enough to go all the way around the cap (and a little extra, just in case). It's about 8 inches wide (the length of the hair/beard). I left one of the long edges intact and cut strips to about 1 1/2 inches from the edge for the hair portion. For the beard I cut a mouth whole about half and inch from the edge and cut the beard hairs up to about another half inch from the mouth hole. The I sewed the wig to the hat from one ear to the other, leaving the front unattached. It fit snugly to his face, but was a bit stretched out by the end of the night (and covered in candy-yuck!). A few more stitches will fix that when it's needed.


I tied a paintbrush into the hair over one ear.


And here's my handsome Leo. The name tag helped with recognition.

Soon to come: Mona Lisa!

Tuesday, August 30, 2011

Cowboy Cac-tie

Cactus ties to wear to the concert of our favorite singing cowboys, The Riders in the Sky.


Too Slim, the bassist, is the inspiration for the cac-tie.


You might think you don't know this cowboy band, but I think you'd recognize some of their music:


Here are the boys waiting for the concert to begin, wearing their Too Slim cac-ties. Yes, that is a snail in Lincoln's hand. Boys will be boys!


Here we are after the concert:


The Riders signed the backs of the boys' ties. What a fun keepsake! (BTW, does Alexander's shirt look familiar?)


The ties were simple to make and hardly took any time at all. I could have made them more complicated, but why? I used a single layer of felt for most of it and stitched around the edges to keep it in shape. I used a tie we already had for getting the basic tie shape, and just free-handed the cactus "arms."


I did put an extra layer of felt on the backs of the cactus "arms" so they would reach skyward. Don't forget to add a couple blooms!


I'm a bit embarrassed to say that I had never actually tied a tie before. A YouTube tutorial remedied my inexperience. It wasn't hard at all! Why do we use clip-on ties, anyway? They're so tricky to make, and the clips can be pricey. I love the authenticity of a real tie. I plan to make some real real ties too (i.e. not clip-on and not cactus-shaped).


You can purchase an authentic Riders in the Sky Cac-tie on their website, here:
http://ridersinthesky.com/index.htm?inc=80&prod_id=3692&sid=17419

Thursday, January 27, 2011

Alligator Clips. Real Ones.


Currently in our homeschool (preschool and Kindergarten) the kids and I are learning about the Everglades, and more specifically, alligators. Today we made these alligator clips out of... alligator clips. The original idea (that my sister came up with when we were planning the school year) was to use clothespins and hang them from a string or use a magnet to hold pictures of alligators. But since I didn't have any clothespins I just used what I had on hand. The boys are having fun making their alligators snap at each other. I've got mine in my hair today—all in the name of making education exciting for my kids—but after today it will probably go on my bulletin board.

P.S. Family and friends: if you would like the link to mine and my sisters' homeschool blog for this year, "Soaring Over America", let me know in an email or comment and I'll send you an invite.

Tuesday, November 30, 2010

Autumn Leaves

Happy last day of Autumn! This project (like many of my projects lately) was inspired by this blog.


I made these Autumn leaves from wool felt I had on hand for various projects. I was surprised and pleased I had so many Fall colors! The embroidery floss also came from my stash (thanks to helping my mom cleaning out her sewing room when she moved a handful of years back!).


As you can see I wasn't quite finished with the embroidery when I took the pictures, but I was quickly running out of daylight, so I took the picture anyway. What I mean to say is, I purposefully didn't finish the project so that you could see what the embroidery floss looks like on my needle!


I hot-glued a brooch pin or hair clip to the back so I could wear them. Like so:


And so:


Do they look cute with my growing baby bump?


I hope you had a wonderful September, October, and November (and First of Octember)! Tomorrow Winter and the Christmas Season may officially begin! (According to my own personal almanac, and despite the eight inches of snow I shoveled from my walk today.)

Saturday, November 20, 2010

Embellished Tees: A Blast From the (Not-Too-Distant) Past

Since I blogged the Little Green Men shirts recently I thought I'd share some of the other t-shirt projects I've made before. Some of these are in my Flickr photo stream (but aren't showing up because I need to upgrade since I reached my 200 free photo limit). Many of these are done with felt because I love the way it looks. I free-hand painted the Ninja Turtle, but I really want to get into freezer paper stenciling. As soon as I can remember to buy some freezer paper, that is!

You might recognize one or two of these:

Monday, October 11, 2010

Pilot Caps, Goggles & Jackets

*UPDATE*
I have now posted the pattern. Scroll down to the end of this post!


Have a young pilot-in-training in your house? I have two! For homeschool this year my sisters and I wrote a theme called "Soaring Over America." Naturally we needed pilot caps and bomber jackets for the kids to wear.


As you can see, these little aviators are equipped and ready for take off!


These inexpensive flight jackets are made from Walmart hoodies. I wanted them to have a collar instead of a hood, so I modified them a little. I like how the soft, wool-looking lining shows a little more with the collar turned down.


The pilot caps are made from thin vinyl, though they could easily be made from felt as well (I'm thinking kids' party favors for an "Up" themed birthday...)


I lined the caps for extra comfort and so I could use some cute fabric lining. Don't you love the stars?


I made the goggles out of felt with an elastic backing.


I was thinking these also make great superhero masks by themselves, but in the end I stitched the goggles to the caps so they wouldn't get lost. It also helps my two-year-old put them on easier.


(back)

Intrigued? Let me give you a hint. I made the goggles in two layers of felt to help them keep their shape better. I cut out one layer with the felt folded in half so they would be symmetrical, then sewed it onto a rectangle of felt for the second later. Not until I was finished with the sewing (well, minus the openings I left for the elastic) did I cut out the second layer. I've done this with some other projects, too. It's helps out a lot.


By the way, if you're interested in a pattern for the the caps I can post it for you. It took me some tweaking to get it the way I wanted it. I don't mind sharing. Especially with Halloween coming! *UPDATE! Pattern posted below*

I made simple initial patches for one sleeve and sewed wings patches onto the other sleeve. The idea is that the kids will earn more patches throughout the year. I even have a genuine air force wings pin for them to earn. I'm excited for that one.


Don't these look fun all ready and waiting for the boys to find them in the morning? The different colored felt and lining helps the boys easily tell which cap belongs to which kid. No fighting over them!


You can bet these will be doubling as Halloween costumes! I even made an extra cap for myself. Hmmmm... Amelia Earhart or Anne Marrow Lindbergh?


PILOT CAP PATTERN
The pictures below are set up so you can easily print each on 8 1/2 x 11" paper. Cut out each picture, overlap them, then tape them together for the pattern. My kids have small heads (as do I), so you'll want to add some seam allowance. I suggest first sewing up a test cap in scrap fabric and adjusting it until you have the right fit. Use felt for a simple, quick cap, or use vinyl and a cotton lining for a fancier one. Feel free to comment or email me with questions. Maybe in the future I'll make it into a full tutorial.


Tuesday, February 9, 2010

Xmas Gifts 7: Felt Pizza

Ahhhh... pizza. Our family loves homemade pizza. Monkey One loves playing "imaginary pizza party" where we send out invitations to our imaginary friends, make pizza together, play games while the pizza is baking, then eat the pizza. I thought I'd make my kids a felt food pizza set to make these pizza parties even better. I actually had been planning on it for quite some time, but I had a difficult time deciding exactly how to do it until this Christmas. I didn't want a ready-made pizza for play eating only. Most of the fun is in putting on the toppings! But if the pizza is whole — better for the making aspect of the pizza — then I sacrifice some of the eating aspect of the pizza, which would be better with slices. I finally decided to compromise on whole mini pan pizzas. They're small enough to just eat, or they can be pretend sliced. I think of it as encouraging imaginative play.


The play pizza is a huge hit pizza! But which is real and which is pretend? Both can be rolled...


Both have sauce, sliced fresh mozzarella and a variety of yummy toppings...


Both are so much fun to make that even a kid can do it...


Well... maybe this kid should only make the play pizza...


And now both are ready for the oven, decked out in our favorite toppings!


(Why is Monkey Two sad? I stopped giving him olives and pineapples to snack on. I almost cut him out of the picture entirely, but he was too cute, even when he was crying.)

One thing is for sure. Your real pizza doesn't keep well. The pretend pizza keeps very well in this handy drawstring bag with individual pockets for every topping you could want and more.


Future additions to our play pizza set:
  • Whole green olives (they are cut out, just not sewn)
  • A 1"-ish wood dowel rolling pin and a pizza slicer made from the dowel and a wood 2-3" disk
  • Canadian bacon with some felt I purchased after Christmas
  • Maybe new pineapple pieces from the lighter yellow felt I also found after Christmas
  • Perhaps some felt pizza party invitations?

Everything was made from wool-blend felt (all except the black olives, for which I only had acrylic craft felt and the white bag, which I didn't want to spend that much money on). I realized a few weeks later when slicing real bell peppers for dinner that the red ones have three sections, but the green ones have four. Shhhhh, don't tell my kids!

P.S. This finishes off my 2009 Christmas Gift posts.

Thursday, January 7, 2010

Felt Snowflakes


My sister Ashley made these beautiful felt snowflakes for me for Christmas. The tutorial came from The Purl Bee. Aren't they exquisite? Ashley did a great job. I love them!
Related Posts Plugin for WordPress, Blogger...