Showing posts with label Sewing. Show all posts

Tuesday, November 6, 2012

Scarlet Pimpernel Costume

My almost-8-year-old chose to be the Scarlet Pimpernel for Halloween. Sir Percy Blakeney is known for his impeccable fashion taste. I don't think he would have worn rolled-up jeans, but that's okay.


Step One: The Coat - My son tried on several women's coats at the thrift store. This is the one he chose because it's supposed to be "really fancy." He didn't like the solid navy wool coat that I chose because it wasn't fancy enough. I relented because I'm trying to let him make more choices (even though I wouldn't have needed to modify the navy one to fit him!). He knew what he wanted and it was perfect. Or soon would be. Once home, I put the coat on him inside-out and pinned along the underarm seam and down the sides of the coat. He helped with the sewing. After sewing I trimmed the seam allowances with pinking shears. I also turned up the sleeve cuffs. Simple and easy. I even sewed and trimmed right over the pockets! The coat is nice and long on him. He seemed upset when I seam-ripped the shoulder pads out, but I didn't feel like giving in on that point.


Next comes the lace: The jabot (jah-boh), cravat (not pictured, but what is just a rectangular strip of white fabric tied around the neck), and the cuffs (which have elastic on them). I never thought I'd ever buy lace for my son's Halloween costume!


The jabot is made of strips of gathered lace sewn to a trapezoid of cotton (actually, two), then sewn to a ribbon with a velcro closure. This particular ribbon and velcro originally came around the Christmas pajama pants I got the kids from Target last year. Yes, I saved it. Yes, I used it. I think I deserve a pat on the back for that. I just realized that I forgot to make lace and/or buckles for his shoes. Ah well, Halloween is always rushed. I don't think I would have had time, anyway!


I didn't know if anyone would recognize "what" his costume was supposed to be, so I asked Alexander if he wanted me to make him a name tag. He said yes, as long as the writing was fancy enough. Apparently my penmanship met his approval. I used some parchment paper scraps I just happened to have around.


The oversized scarlet pimpernel flower was a cheap-o poinsettia from the dollar store. It used to have seven petals but I cut off two to make it star-shaped and hot-glued the empty spaces together as I was gluing the flower to the name tag. Yes, I also have a stash of brooch pin backs.


The green vest was from an old white rabbit costume that my sister wore in a ballet recital many years ago. I'm glad it didn't clash with the coat. Black trouser socks and dress shoes finished off the bottom half of the costume. The sword helps balance out the masculinity of the costume. Sink me! If only I had time to find a magnifying glass for a chain around his neck.


They seek him here, they seek him there...

Friday, October 14, 2011

Blessing Cap and Shoes

Hello! It's been a long time since I've posted. I had forgotten that I hadn't finished this post that I started ages ago. I actually made an heirloom! Two of them! Well, three of them, if you count each little shoe separately.


Ivory wore a real family heirloom gown for her baby blessing that many of her female relatives* wore for their own blessing or christening. Including Yours Truly. The various parts of the dress were made by my great-grandmothers, and the slip was even made from a pillowcase belonging to my great-great grandmother. That's Ivory's great-great-great grandmother!

*Ivory's mother, maternal grandmother, great aunt, all her maternal aunts and female cousins, and 3 first-cousins-once removed.


I wanted her also to wear something special and homemade that she would be able to keep as her own. I used some lace and ribbon my mom had lent me to make a blessing cap and tiny shoes.

(Photos of Ivory taken by Deborah Harroun)

Isn't she the sweetest? I wanted the cap to be a special heirloom. But that thought was so intimidating that I had to put it aside before I got the courage to start sewing! 

Various ideas I doodled before choosing one.

Here's my final pick. Strips of the embroidered, raw-edge lace sewn together into a long rectangle. With matching, scalloped-edge lace for the ruffled front.

I sewed a casing on the back and fed some ribbon through it.


I tightened the ribbon and tied it in a bow to form the cap shape.


Ta da!

Now on to the little shoes...

I literally made these the morning of Ivory's blessing (church doesn't start until 1pm, thank goodness). I made them in the same general manner of the ribbon ballet slippers I made earlier in the year. 


They are teeny-tiny! So I only made her wear them once. Twice. It was worth it, though, especially since she gets to keep them!  (And since it didn't take me long to make them.)

There you go, Sweetheart.

Tuesday, August 30, 2011

Cowboy Cac-tie

Cactus ties to wear to the concert of our favorite singing cowboys, The Riders in the Sky.


Too Slim, the bassist, is the inspiration for the cac-tie.


You might think you don't know this cowboy band, but I think you'd recognize some of their music:


Here are the boys waiting for the concert to begin, wearing their Too Slim cac-ties. Yes, that is a snail in Lincoln's hand. Boys will be boys!


Here we are after the concert:


The Riders signed the backs of the boys' ties. What a fun keepsake! (BTW, does Alexander's shirt look familiar?)


The ties were simple to make and hardly took any time at all. I could have made them more complicated, but why? I used a single layer of felt for most of it and stitched around the edges to keep it in shape. I used a tie we already had for getting the basic tie shape, and just free-handed the cactus "arms."


I did put an extra layer of felt on the backs of the cactus "arms" so they would reach skyward. Don't forget to add a couple blooms!


I'm a bit embarrassed to say that I had never actually tied a tie before. A YouTube tutorial remedied my inexperience. It wasn't hard at all! Why do we use clip-on ties, anyway? They're so tricky to make, and the clips can be pricey. I love the authenticity of a real tie. I plan to make some real real ties too (i.e. not clip-on and not cactus-shaped).


You can purchase an authentic Riders in the Sky Cac-tie on their website, here:
http://ridersinthesky.com/index.htm?inc=80&prod_id=3692&sid=17419

Tuesday, August 23, 2011

Lace and Ribbon Rose Cuff Bracelet

 
Remember a few months back when I was making ribbon flowers at my mom's house? This is one that I had leftover. The rose is made from grosgrain (the ribbon, not the "fabulous" blog!) and the leaves from a satin ribbon.

 
The embroidered lace was left over from Ivory's blessing cap (Have I blogged that yet??). I took an extra wide ribbon for the back of the cuff and folded it lengthwise over the raw edges of the lace.

 
At first I had metal hooks and loops, but the cuff looked too metally (like my mouth when I had braces a few years back). So I took off the loops and stitched some from thread. The exposed loops give it an old-fashioned corset look, I think. Very romantic.

 
As you can see, one of the satin leaves is snagged. That's what I get for not taking pictures before I wore it so many times! I guess now I can call it "shabby chic."

I have sensitive wrists, so I don't wear bracelets and watches very often. This is one that won't give me a rash because it's made of fabric with no metal parts touching my skin! Another romantic element!

Sunday, July 24, 2011

Baby Dress

Hi there! It's been awhile since I've posted, but not for a lack of "stuff" to blog about. Does anyone else have a hard time doing everything they want to do? My life story. Anyway, here's a dress I made for Ivory a couple of months ago. It's made from two fat quarters. The fabric is called "Spa" by Rosemarie Lavin for Windham Fabrics.


I copied a dress from Target. Plagiarizing a finished piece of clothing is more interested to me than following a pattern. It was still a bit chilly when I took these pictures, hence the long sleeves underneath the dress.


It turned out a little short, so it's more like a pinafore top. I might add another skirt tier, or at least make a matching diaper cover.


Mmmmmm...grass. And yes, the front of her dress is wet. What can ya do?


Detachable flower pin/clip.


I have plans to make more of these little dresses. Also perhaps a tutorial...?

Thursday, March 24, 2011

Newborn Bibs

You know when you spend several minutes getting your baby into clean, fresh, adorable clothes and then—wham!—she spits up all over the front and neck of them and then you have to change her whole outfit all over again? Well, here's a little solution: spit up bibs. Then when she spits up unexpectantly you only have to change her bib!


I made two: ruffled and flowered. I think I need more in several colors!


She started getting fussy so I had to put her pacifier in for the rest of the pictures.


You might recognize the fabric from the Stella Pixie Hat Knockoff (here and here). I needed something to match the cute hat, since all of her clothes are pink.


So here they are, paired together:


See what happened when I pulled the "plug" out?


I made these bibs a few weeks ago but held off blogging them because I never put the fasteners on them. In the meantime I've been using safety pins. You know what? I have no idea when I'll get around to putting snaps or Velcro on them! They are not perfect, but they'll do!

While we're talking about bibs, I'll throw this in:


I just saw this picture of my nephew wearing one of the bibs I gave him. It's fun to see something I made actually being used. What a cutie he is!

Monday, March 21, 2011

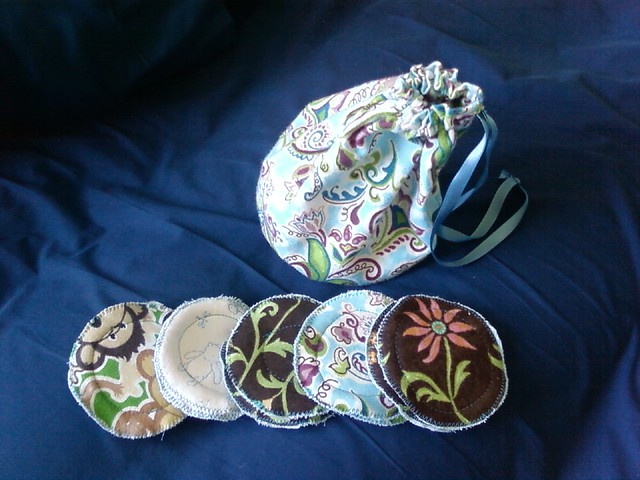
Breastfeeding Pads -Or- What To Do With Old Flannel Blankets

With a newborn baby there's one thing that's constantly on my mind: Breastfeeding. And everything that goes along with it. These nursing pads are lined with layers of flannel from old, ugly blankets on the inside and newer cute flannel on the outside. I actually made these a couple years ago when Lincoln was a baby and now I'm using them again with Ivory.


My favorites are the ones with the pink flowers. The pretty/fun fabric puts a smile on my face when I use them. Why not spice up an otherwise ordinary item? It makes life just a little brighter. Another bonus: these breastfeeding pads soak up more milk than the store-bought cloth pads I have.

Friday, March 18, 2011

Ribbon Flowers 2: Black Eyed Susan

I'm continuing with my wire ribbon flower adventures at my mom's house. Yesterday I did indeed finish the black eyed susan I had started before.

Aren't these cheery? I love to see black eyed susans growing alongside the road in the summer. And although it's March, I just couldn't resist making this flower when I saw the pattern in the book.


Cute, isn't it? And even cuter on the girl. It still needs to be put on a clip, and then probably on a headband until Ivory's hair is thick enough to keep it in (although her hair is certainly long enough!). I might have to borrow it from her in the meantime. Or maybe we'll just share it always :)


Since Pfaffy is all alone in a dark storage unit for a week or two I hand-sewed the whole flower. This way I got to hold a cute baby on my lap and sit on a couch!


My favorite part was pulling the gathering stitches together. It was so satisfying! I didn't have any clear nail polish or Fray Check, so I singed the raw edges of the ribbon. You can see the burn marks here from the back view of the flower.


 The button for the "black eye" came from my mom's stash. And speaking of that...


Here are the ribbons I was telling you about. She likes to organize by color the same way I like to line up my M&Ms by color when I'm eating a handful. Pretty, aren't they?

And here are the books I used. The black eyed susan is in A Passion For Ribbonry by Camela Nitschke. Alexander's ribbon roses came from The Artful Ribbon by Candace Kling. The second book has lots of pictures of vintage clothing embellished with ribbons alongside instructions for many, many flowers. It's fun to look at, though somewhat old-fashioned. The instructions were clear and quite thorough. The first book has more fresh ribbon flowers (if ribbon flowers can be fresh!). The hat-decorating projects are a bit too dated for a young, hot, hip, 2011 mamma like me (cough, cough), but the flowers themselves are really fun and the instructions were great.

Next time I'll show you the first wire ribbon flower I started: some sort of geranium. I have to find it, though. It's so little that I'm not sure where it ended up!

Happy crafting!
Related Posts Plugin for WordPress, Blogger...