Showing posts with label Christmas Gifts. Show all posts

Monday, December 17, 2018

Hairpin Tin

A spiffied-up Altoids mints case to hold my daughter's bobby pins and hairpins for ballet. This will make my life so much easier! This will go in her Christmas stocking, so shhhhhh!

I free-handed the embroidery on felt. Other tools: my good ol' pinking shears and trusty E-6000 glue.


Wednesday, January 11, 2017

Owl Ornament Frames

Hi blog, remember me?

I painted some little owl ornaments my boys got in their stockings once upon a Christmas Past. I followed the craft wood outlines only vaguely and looked at a photo of a great horned owl for coloring.


Hangin' on the tree
(This is the first time I've had an artificial tree since childhood.
I have mixed feelings, but boy, is cleanup easy!)


Before the paint job, hanging from the boys' stockings.  Santa originally thought the boys would want to paint them themselves, but in the end they asked me to do it... 5 years later!

Excellent bird!
http://fineartamerica.com/products/captive-great-horned-owl-bubo-raymond-gehman-greeting-card.html


They're almost camouflaged on my counter!

Friday, January 4, 2013

Leonardo Tees

I made these Vitruvian Man t-shirts for the kids for Christmas since we studied Leonardo da Vinci in homeschool. He became somewhat of an icon for us.


I used freezer paper stencils (tutorial on MADE) cut out by my SIL & BIL's handy-dandy Silhouette machine (I think I need one of those... Oh, the possibilities!).


I used the same cut twice - once each for the image and reverse of the image. I like the way both of them turned out. This also helps the kids keep track of their shirts.


I made a few sets of these for cousins, too. I tried doing a few with spray paint instead of fabric medium paint, but it turned out so badly I had to start over. I tried fabric spray paint, too, but I was not pleased with the results. I guess I need more practice. For now I'll stick to the traditional method.


If only we had these shirts when we went to the Leonardo Museum a few months ago!

Wednesday, December 29, 2010

Homemade Christmas: Canvas Silhouettes (with Tutorial!)

Now that all the gifts have been opened I can share my Christmas projects with you! This year my sister Sadie and I had each other for family gifts.


I made each child a silhouette of themselves, and a combined one for my sister and her husband. After sending off the gifts I was nervous that the kids would be upset they weren't getting toys from me. I'm happy to say that I've only heard good reports, and even my brother in law seems to like them (and he's not a homemade gift kind of guy). What makes this gift fun is that it can really show the personality of each person.


Interested in making one yourself? Here's a quick tutorial:

Step 1: Taking or Finding Photos. As you can see, the pictures don't need to be super-high quality. For these I had my nieces and nephew do fun poses. I got some great action shots of my nephew and some cute poses from the baby, but nothing exciting from the older girl, who was not in the mood for pictures. So I looked back and found a cute picture of her playing in the mud in her swimsuit. Now THAT was a pose with personality! Since she loves wearing skirts I Photoshopped a skirt from a different picture onto the swimsuit one. Ta-da!


Step 2: Photoshopping(Optional). I wanted to see what the finished product would look like before I decided to proceed. So I used my eraser tool in Photoshop to crop around the whole picture to just the person. (It helps if the person is in front of a solid white background so you can use the Magic Wand tool.) Then I made the person a solid color and played around with the fonts until I had it the way I wanted:


Step 3: Printing and Cutting. Print your photo (or Photoshopped image) and cut out the image to make a stencil. I tried using both the white space background and the image as the stencil, but really it just depends on what colors you want for the foreground and background. (For the couple silhouette I actually used both stencils.) Use a small pair of scissors or an X-Acto knife for cutting. Print an extra copy that won't be cut to have on hand for reference, especially if it is a detailed image.


If you're using two people in different colors then cut out each person separately.


Step 4: Grab your Canvas. For the kids I used 8x10" canvases that can be hung straight on the wall. For the couple I found a thin flat 9x12" canvas to fit the frame I already had.

Step5: Stencil Painting. Place your stencil on the canvas. I just held the paper in place with my hand. (I wonder if freezer paper stenciling works on canvas? I'll try that next time.) Instead of mixing paints to get your colors, I suggest just picking a color straight from the paint tube. It just makes touch-ups easier. It's hard to match a mixed color after it's dry. I used acrylic craft paints from a craft store.

For this one I painted the background a solid color and left the person the white color of the canvas. Later I painted over her in cream, but since she was already white I didn't have to paint multiple coats. For the kids' silhouettes I had my own boys help me paint the whole canvas a solid color, then I used the stencil to paint the person on in white. I had to do a few coats since I was painting with a light color on top of a dark one.


If you're doing two people in different colors: let the first person dry, then use your 2nd person stencil:


Step 6: Touching-Up and Names. Touch up any little mess-ups you may have made and paint on the names. I chose to do this free-hand because making a stencil for all those little letters seemed much too tedious!


Step 7: Varnish. With acrylic craft paints you should really put some sort of finish on it. I like to use varnish with a satin finish (instead of gloss). You could also use Mod Podge.


And your done! Okay, maybe this wasn't as "quick" a tutorial as I expected, but hopefully it helps.

I put this one into a frame to make it more elegant, but mostly because I happened to already have a nice frame with no glass. The painting didn't need it! (I left the cardboard corners on the frame since the gift was taking a road trip to California).

Wednesday, November 24, 2010

Twilight Goodies


For anyone looking for some Twilight stocking stuffers, I just updated my Etsy shop with the handmade vinyl key chains and rectangular coin/credit card purses I made for the Eclipse premier.

Tuesday, February 9, 2010

Xmas Gifts 7: Felt Pizza

Ahhhh... pizza. Our family loves homemade pizza. Monkey One loves playing "imaginary pizza party" where we send out invitations to our imaginary friends, make pizza together, play games while the pizza is baking, then eat the pizza. I thought I'd make my kids a felt food pizza set to make these pizza parties even better. I actually had been planning on it for quite some time, but I had a difficult time deciding exactly how to do it until this Christmas. I didn't want a ready-made pizza for play eating only. Most of the fun is in putting on the toppings! But if the pizza is whole — better for the making aspect of the pizza — then I sacrifice some of the eating aspect of the pizza, which would be better with slices. I finally decided to compromise on whole mini pan pizzas. They're small enough to just eat, or they can be pretend sliced. I think of it as encouraging imaginative play.


The play pizza is a huge hit pizza! But which is real and which is pretend? Both can be rolled...


Both have sauce, sliced fresh mozzarella and a variety of yummy toppings...


Both are so much fun to make that even a kid can do it...


Well... maybe this kid should only make the play pizza...


And now both are ready for the oven, decked out in our favorite toppings!


(Why is Monkey Two sad? I stopped giving him olives and pineapples to snack on. I almost cut him out of the picture entirely, but he was too cute, even when he was crying.)

One thing is for sure. Your real pizza doesn't keep well. The pretend pizza keeps very well in this handy drawstring bag with individual pockets for every topping you could want and more.


Future additions to our play pizza set:
  • Whole green olives (they are cut out, just not sewn)
  • A 1"-ish wood dowel rolling pin and a pizza slicer made from the dowel and a wood 2-3" disk
  • Canadian bacon with some felt I purchased after Christmas
  • Maybe new pineapple pieces from the lighter yellow felt I also found after Christmas
  • Perhaps some felt pizza party invitations?

Everything was made from wool-blend felt (all except the black olives, for which I only had acrylic craft felt and the white bag, which I didn't want to spend that much money on). I realized a few weeks later when slicing real bell peppers for dinner that the red ones have three sections, but the green ones have four. Shhhhh, don't tell my kids!

P.S. This finishes off my 2009 Christmas Gift posts.

Monday, January 25, 2010

Xmas Gifts 6: Bean Bag Cubes


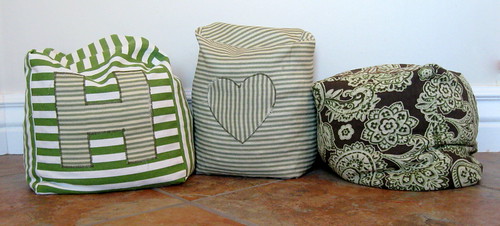
My husband enjoys laying on our family room floor. From there he reads, uses his laptop, and watches TV. He's always grabbing for something to prop up his head. But he doesn't use soft objects like a normal person would (no offense, Amore). I've seen him use books, VHS tapes, and remote controls (all standing on their ends) as pillow substitutes. I don't know, maybe it's a macho thing that he can't use anything fluffy? So for Christmas I made him some bean bag pillows to do the trick. The beans make them sturdy yet pliable, so he can shape them the way he wants. I made them in different sizes as well.


Actually, I didn't mean for them to turn out so big. I used up most of a 5-gallon bucket of pinto beans from our food storage, and still didn't have quite enough! I'm considering picking the bean bags apart to make them smaller because they are also quite heavy.


I made each bean bag out of fabric I already had on hand, fabric that I like, so that I wouldn't mind seeing them strewn all over the family room floor. I also put some appliquéd messages on them, though I suppose that's not very manly. The appliqués are already coming apart, so I obviously need more practice in that department.


The inspiration for these came from Paper and String's fun doorstops. And, although I only saw these after I had finished the bean bags, they also remind me of Dana's giant Rollie Pollie pillow, but only because (1) we both made some sort of pillows, (2) IKEA fabric was involved, and, (3) let's face it, I just adore her and want to be as cool as she is.

I still have one more Christmas gift to post, then on to some more fun (and more current) stuff.

Friday, January 8, 2010

Xmas Gifts 5: Ashley Purse

My second vinyl purse attempt. This one is a little bigger. It's more like a slim diaper bag. In fact, I tried to make it the same dimensions as my Similac diaper bag from the hospital. I'm embarrassed to admit that. You know the one I'm talking about. It's really the perfect size bag. Ashley's bag is much cuter, though. I love the little bird on it.


I stitched along all the seams to help the purse keep its shape. I was a little disappointed at first because right up until the very last step it looked more like a messenger bag with its flap missing. Then I stitched those final outer seams along the top section and--voila!--the whole thing came together. I was pleased.


Isn't this the cutest little guy? I just want to toss him some bread crumbs.


Here's the lining. Recognize it? It's from IKEA. The little bird on the front of the purse is from this fabric. I love the little inner side pockets. They are perfect for keeping keys and chapstick handy.


Just as I was about to send this home with my brother to give to Ashley in California I realized I didn't have any pictures of the purse on a human. So here I am, modelling the purse at 11 o'clock at night while my brother snapped the picture for me. He actually paid me a huge complement: When he saw the purse he looked a little surprised, maybe even dumbfounded, and told me it looked like the kind of bag his friends would buy from some hip store. He's in with the cool, film student, artsy crowd, and I know nothing about cool, so I was very pleased to get the complement.
(In case you were wondering: The bracelet I'm wearing is one of the gifts my sister Ashley gave me for Christmas. My sister Bridey made me the knit hat for Christmas last year).

Thursday, January 7, 2010

Felt Snowflakes


My sister Ashley made these beautiful felt snowflakes for me for Christmas. The tutorial came from The Purl Bee. Aren't they exquisite? Ashley did a great job. I love them!

Tuesday, January 5, 2010

Xmas Gifts 4: Horse of a Different Color


Do you remember Rainbow Brite and her horse Starlite back from the '80s? I had both toys as a kid. Several years ago I got rid of the horse by giving it to one of my nieces. It recently turned up when my mom moved. Mom showed up on my doorstep all pleased that she had found it for me.

It was dirty.

And it had rainbow colored hair.

My youngest little monkey took to it immediately, tucking it under his arm and blowing raspberries (that's his horse impersonation). But as much as I love looking at rainbows in the sky, seeing one on a toy horse's mane in my son's arm was a little disturbing. I hated to throw it away and waste it, especially since the kid liked it so much. So a master plan began unfolding in my mind: I'd give the horse a makeover. I wouldn't be wasteful, it would be a fun challenge, my son would have a "new" toy horse for Christmas, and it would be cool to think that it was the toy that I once played with.


I covered the hoofs by sewing little caps of black stretch velvet and stretching them over the glue-covered old hoofs (FYI I used flexible fabric flue). Later, close to the end of the project, I hand-sewed the hoofs in place to the bottom of the newly covered legs.


I made small triangles for the ears, then hand stitched them in place around the base. The next step was the to cut out the body pieces of the gray velvety fabric to fit onto the horse. I used the seam lines from the original horse as a guide. I machine stitched the fabric for the horse's back from behind the ears to the tail, then pinned it in place. All the other pieces were first pinned (or rather stabbed) in place then hand stitched.


These pictures were taken at various wee and not-so-wee hours of the morning on Christmas Day while everyone was asleep. Jane Austen on the DVD player kept me company. It was almost dawn when I went to bed. The horse was still hairless and had pins sticking out in a few places, but I wrapped it and put it under the tree anyway, then finished it up later after it was unwrapped. A 19-month-old child doesn't know the difference, right? Just as long as he can open a present on Christmas morning?


I really would have like the horse to be brown, but I couldn't find the right fabric in the little time I had to look (It was a busy season). So the color gray had to do. The fabric is so soft. It's some sort of velvet, though I don't remember exactly what. The black hoofs are stretch velvet, and the mane and tail are simply yarn. I'm happy to say that my little monkey loves the horse. And now I do, too.


Related Posts Plugin for WordPress, Blogger...