Showing posts with label Painting. Show all posts

Wednesday, January 11, 2017

Owl Ornament Frames

Hi blog, remember me?

I painted some little owl ornaments my boys got in their stockings once upon a Christmas Past. I followed the craft wood outlines only vaguely and looked at a photo of a great horned owl for coloring.


Hangin' on the tree
(This is the first time I've had an artificial tree since childhood.
I have mixed feelings, but boy, is cleanup easy!)


Before the paint job, hanging from the boys' stockings.  Santa originally thought the boys would want to paint them themselves, but in the end they asked me to do it... 5 years later!

Excellent bird!
http://fineartamerica.com/products/captive-great-horned-owl-bubo-raymond-gehman-greeting-card.html


They're almost camouflaged on my counter!

Wednesday, December 29, 2010

Homemade Christmas: Canvas Silhouettes (with Tutorial!)

Now that all the gifts have been opened I can share my Christmas projects with you! This year my sister Sadie and I had each other for family gifts.


I made each child a silhouette of themselves, and a combined one for my sister and her husband. After sending off the gifts I was nervous that the kids would be upset they weren't getting toys from me. I'm happy to say that I've only heard good reports, and even my brother in law seems to like them (and he's not a homemade gift kind of guy). What makes this gift fun is that it can really show the personality of each person.


Interested in making one yourself? Here's a quick tutorial:

Step 1: Taking or Finding Photos. As you can see, the pictures don't need to be super-high quality. For these I had my nieces and nephew do fun poses. I got some great action shots of my nephew and some cute poses from the baby, but nothing exciting from the older girl, who was not in the mood for pictures. So I looked back and found a cute picture of her playing in the mud in her swimsuit. Now THAT was a pose with personality! Since she loves wearing skirts I Photoshopped a skirt from a different picture onto the swimsuit one. Ta-da!


Step 2: Photoshopping(Optional). I wanted to see what the finished product would look like before I decided to proceed. So I used my eraser tool in Photoshop to crop around the whole picture to just the person. (It helps if the person is in front of a solid white background so you can use the Magic Wand tool.) Then I made the person a solid color and played around with the fonts until I had it the way I wanted:


Step 3: Printing and Cutting. Print your photo (or Photoshopped image) and cut out the image to make a stencil. I tried using both the white space background and the image as the stencil, but really it just depends on what colors you want for the foreground and background. (For the couple silhouette I actually used both stencils.) Use a small pair of scissors or an X-Acto knife for cutting. Print an extra copy that won't be cut to have on hand for reference, especially if it is a detailed image.


If you're using two people in different colors then cut out each person separately.


Step 4: Grab your Canvas. For the kids I used 8x10" canvases that can be hung straight on the wall. For the couple I found a thin flat 9x12" canvas to fit the frame I already had.

Step5: Stencil Painting. Place your stencil on the canvas. I just held the paper in place with my hand. (I wonder if freezer paper stenciling works on canvas? I'll try that next time.) Instead of mixing paints to get your colors, I suggest just picking a color straight from the paint tube. It just makes touch-ups easier. It's hard to match a mixed color after it's dry. I used acrylic craft paints from a craft store.

For this one I painted the background a solid color and left the person the white color of the canvas. Later I painted over her in cream, but since she was already white I didn't have to paint multiple coats. For the kids' silhouettes I had my own boys help me paint the whole canvas a solid color, then I used the stencil to paint the person on in white. I had to do a few coats since I was painting with a light color on top of a dark one.


If you're doing two people in different colors: let the first person dry, then use your 2nd person stencil:


Step 6: Touching-Up and Names. Touch up any little mess-ups you may have made and paint on the names. I chose to do this free-hand because making a stencil for all those little letters seemed much too tedious!


Step 7: Varnish. With acrylic craft paints you should really put some sort of finish on it. I like to use varnish with a satin finish (instead of gloss). You could also use Mod Podge.


And your done! Okay, maybe this wasn't as "quick" a tutorial as I expected, but hopefully it helps.

I put this one into a frame to make it more elegant, but mostly because I happened to already have a nice frame with no glass. The painting didn't need it! (I left the cardboard corners on the frame since the gift was taking a road trip to California).

Thursday, November 25, 2010

Happy Thanksgiving!

There's so much I'm thankful for. I'm especially grateful for my husband, two boys, and a little baby girl I have yet to get to know. Have a delicious, meaningful, safe and fun Thanksgiving!


This is a set of autumn-themed paper mache boxes I made a few years back to sit on my desk at the office (back when I was a full-time employee). I kept Tootsie Rolls in them. Now I can't do that or my kids will eat them all at once! but I still set the boxes out every year with my Fall decorations.
Saturday, November 20, 2010

Embellished Tees: A Blast From the (Not-Too-Distant) Past

Since I blogged the Little Green Men shirts recently I thought I'd share some of the other t-shirt projects I've made before. Some of these are in my Flickr photo stream (but aren't showing up because I need to upgrade since I reached my 200 free photo limit). Many of these are done with felt because I love the way it looks. I free-hand painted the Ninja Turtle, but I really want to get into freezer paper stenciling. As soon as I can remember to buy some freezer paper, that is!

You might recognize one or two of these:

Monday, March 29, 2010

The Painted Egg

I'm alive! I can hardly believe it's been a month since I last posted. I've been on vacation! I have lots to share with you, but I wanted to start with this since Easter is this week.


These painted wooden eggs are becoming a little Easter tradition for our family. They are nice because they won't rot or break! The wooden eggs came from the craft store (Michael's, I think) and are painted with acrylic craft paint. Be sure to buy enough eggs for your kids to paint with you!


Silhouette Eggs

I love the old fashion silhouette look. I recently got my younger son's silhouette cut at Disneyland. But honestly, I always think afterwards that I could have done it just as well myself. That was what inspired these eggs.

How I made the silhouettes:
1. I freehand-outlined my kids'profiles onto the background paint with a pencil. (You could also cut out a side-view picture of your kids and trace around the edges).
2. Next I traced over the pencil lines with a black pen. I suggest using a Sharpie or something that won't bleed when you put the varnish on.
3. Then I filled in the outlines with black paint.
4. I wrote the name on the egg with a pencil, and traced over it with a fine paintbrush. This could also be done with a non-bleeding pen. Be sure to mark the year on the bottom as well!
5. The last step is to put a varnish on it. I prefer a satin finish, and I suggest taking pictures before you do it so the shine doesn't get in the way. But I only had a glossy varnish on hand and my husband had our camera for the day. That's okay, too.

Family Egg

This is one I painted in 2007 when we only had one child. As you can see, the details are not perfect, but the egg is still whimsical and special. The back says, "The Henage Family"

Spring Chick and Bunny Egg

Another old fashioned-inspired egg I made this year. The bunny is Tony, who was my pet rabbit when I was little.

Monkey One's Mouse Egg

This one has a gray mouse with black whiskers and gray rainclouds in the sky.

Monkey One's Family Egg

This one has our family in it (the little black figures) and Winnie the Pooh. The pictures would have turned out clearer if I had given him a non-bleeding pen to use instead of paint, but I like that he has exposure to using different media. I tried not to tell him how and what to paint, but let him exercise his own creativity. Sometimes that's hard for me!

Monkey Two's Egg

Even my almost-two-year-old got in on the fun. Though he was mostly painting his own hands!

I love that I can keep these eggs and decorate our house with them year after year. And now I want to see your eggs!

Tuesday, January 19, 2010

Family Mailbox

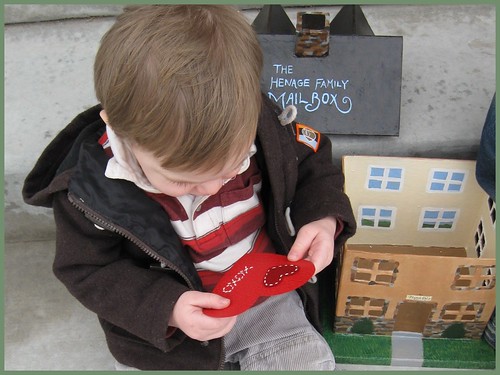
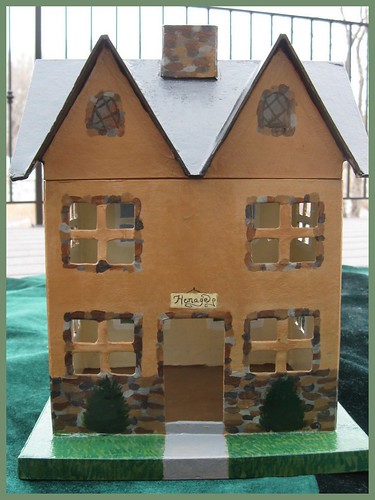
When I was little my mom made us an indoor family mailbox. It looked like a little cottage home with slots on the back for each family member. We sent each other notes and items we had ordered from each other's mail order catalogs throughout the year, but the busiest time for our family mailbox was Valentines Day. A few years ago I bought a paper mache house to make my own family mailbox. Since Valentines Day is right around the corner I thought now would be the perfect time to paint it.


I tried to make the coloring and style look a little like our own house. Wouldn't it also make a fun toy house to play with a little wooden peg family?


What's inside? Two Valentine cards!


I thought the house would be so cute photographed on our front lawn. Then I remembered that it's January and all we have is footprint-covered snow. I tried it on the snow, but the white washed all the color out of the pictures, and my little monkey wouldn't stop throwing snowballs at it. So the Christmas tree skirt and my front porch steps will have to suffice.


I was having a lot of fun painting the jasmine plant climbing up the side of the house. Then it suddenly reminded me of a Thomas Kinkade painting so I immediately had to stop. The other side has a birdhouse and agapanthus plants. Hmmmm... I wonder if it would work to paint flowers on the side of my real house to make it look like I have a garden. Do you think my neighbors would notice?


Here's the before picture. House purchased from Hobby Lobby.


My oldest little monkey and I have already exchanged several letters with each other using our new mailbox. A new (old) family tradition!

Tuesday, October 27, 2009

Indian Family Peg People


I remembered to take these pictures before I put the finish on so there wouldn't be a glare. The woman's clothing is from a painting in a library book about Plains Indians. The little boys' clothing is from a costume pattern we are using to make real costumes for the boys.


My son and I made these as a homeschool activity. I keep finding them in his pants pockets. These would be fun to play with together with the Little House on the Prairie play people I made for my niece.

Sunday, July 26, 2009

Daddy Laptop Desk

This is belated, I know. This is the laptop desk that the little monkeys and I made for father's day / Marito's birthday (yes, it's sad for him to have both in the same week because he often just gets one combined gift). Marito usually uses large book to keep his legs from getting too hot from his laptop computer. When I saw the unfinished lap desk at Hobby Lobby I knew it was the perfect thing, and I could make it so much snazzier than the old book he was using.

This painted side is a personal joke. That's Marito, going about his business "in a professional manner." I was very pleased with the way the illustration turned out. I wasn't so pleased with the lettering. I redid it several times but finally gave up and just settled.

The Father's Day side is a collage of photos of Marito and the boys from (roughly) the last year. I've made him a few mini photo albums with the same idea in years past, and this is just a variation on the theme. The surface isn't perfectly smooth, but I wasn't worried about that since he wouldn't be using it for handwriting. I used Mod Podge for the gluing and finishing, but it seems the Mod Podge sometimes gets a little sticky when it gets very hot. Any suggestions?

It's fun to look at all the 54 of the little pictures of father and sons enjoying life together. I hope the collage gives a cheery boost to his workday.

My paintbrush box was lost so I only had large ones from my grandmother's craft boxes. It was the first time they've been used since her death 10 years ago next month. I felt privileged to use her artist tools. She was a watercolorist, and had beautiful lettering. Her paintbrushes were probably cringing under my use! Thanks, Grandma. Another special thanks to Aunt Cynthy (again) for lending me her I Love Lucy DVDs. They make a great background for crafting late into the night.

Thursday, June 4, 2009

A Cowboy Needs A Costume


I made these costumes for the cowboy section of our "Wild Wild West" homeschool year theme. These costumes started with vests, and evolved from there over the course of a couple months. I decided to post all the parts of the costumes together in one big post instead of doing several small ones.


1. Monkey One's cowboy vest. Corduroy, lined with cute cowboy quilting fabric (which will also be making an appearance in the cowboy quilt we're making right now. More on that later)


2. Monkey Two's cowboy vest in denim, lined with a more cutesie cowboy fabric. I decided to add the pockets afterwards. And look! I never got around to putting the buttons on. Oops. He's been wearing it just the same.


3. Chaps


3a. Monkey One's "woolly" chaps made from faux fur. He helped make these:


Cutting


Sewing


3b. Monkey Two's chaps made from a cowprint velboa.


4. Did you notice the belt buckle on Monkey Two? Here are both of them together. We painted them onto wooden disks from the craft store, then pinned them onto their chaps belts.


4a. Monkey One paints the finish onto his belt buckle. He chose the design he wanted after we looked at some samples. Then he painted the gray background before I painted on the design.


5. Spurs
Made from vinyl, kids craft foam covered with some shiny silver fabric (though next time I would leave the shiny fabric out), paper crafting brads, hot glue, thread, and jingle bells to give it some "jingle jangle jingle."

This was before we got cowboy boots. I wish I could say the spurs are nice and sturdy, but they fall apart a lot and I just glue them back together. I never have much luck with hot glue!


Monkey One cuts out a spur


6. Cowboy boots for Monkey Two
I got the idea for these from some cute little furry lined infant slippers that Target used to carry. These are made from thin vinyl with a soft backing. They have fringe along the back, some fun stitching, and there is a jingle bell sewed on where spurs might go. They close with Velcro behind the fringe. I'm quite proud of these, except that they don't stay on very well. I think they need some sort of cinching around the ankle. But for an infant with limited mobility they work fine. And they're darn cute, if you ask me.

I actually made some similar ones for my first little monkey when he was two. I had the same problem with them coming off. I wish I could find them so I could post a picture.


There you have it! My cute boys with their cowboy costumes. The nice thing about these costumes is that they can wear them with whatever shirt and pants happen to be clean at the time. A hat and bandanna helps, too.

The following is a little embarrassing, but it's about the costumes and it's really fun. So I'll share. We made up an additional verse to the Disney 1950's A Cowboy Needs A Horse short. Our new verse lists a shirt, vest, belt, chaps, bandanna and adventure log (Monkey One's school journal). We made our own fun video of the whole song, which you can see here, if you like. But I warn you, I'm not much of a singer. Be sure to watch after the credits for a smashbang finish of an outtake.

A Cowboy Needs A Horse Movie

Related Posts Plugin for WordPress, Blogger...