Tuesday, February 9, 2010

Xmas Gifts 7: Felt Pizza

Ahhhh... pizza. Our family loves homemade pizza. Monkey One loves playing "imaginary pizza party" where we send out invitations to our imaginary friends, make pizza together, play games while the pizza is baking, then eat the pizza. I thought I'd make my kids a felt food pizza set to make these pizza parties even better. I actually had been planning on it for quite some time, but I had a difficult time deciding exactly how to do it until this Christmas. I didn't want a ready-made pizza for play eating only. Most of the fun is in putting on the toppings! But if the pizza is whole — better for the making aspect of the pizza — then I sacrifice some of the eating aspect of the pizza, which would be better with slices. I finally decided to compromise on whole mini pan pizzas. They're small enough to just eat, or they can be pretend sliced. I think of it as encouraging imaginative play.


The play pizza is a huge hit pizza! But which is real and which is pretend? Both can be rolled...


Both have sauce, sliced fresh mozzarella and a variety of yummy toppings...


Both are so much fun to make that even a kid can do it...


Well... maybe this kid should only make the play pizza...


And now both are ready for the oven, decked out in our favorite toppings!


(Why is Monkey Two sad? I stopped giving him olives and pineapples to snack on. I almost cut him out of the picture entirely, but he was too cute, even when he was crying.)

One thing is for sure. Your real pizza doesn't keep well. The pretend pizza keeps very well in this handy drawstring bag with individual pockets for every topping you could want and more.


Future additions to our play pizza set:
  • Whole green olives (they are cut out, just not sewn)
  • A 1"-ish wood dowel rolling pin and a pizza slicer made from the dowel and a wood 2-3" disk
  • Canadian bacon with some felt I purchased after Christmas
  • Maybe new pineapple pieces from the lighter yellow felt I also found after Christmas
  • Perhaps some felt pizza party invitations?

Everything was made from wool-blend felt (all except the black olives, for which I only had acrylic craft felt and the white bag, which I didn't want to spend that much money on). I realized a few weeks later when slicing real bell peppers for dinner that the red ones have three sections, but the green ones have four. Shhhhh, don't tell my kids!

P.S. This finishes off my 2009 Christmas Gift posts.

Friday, February 5, 2010

Celebrate The Boy Collar Tutorial


Hello! I'd like to shout a special welcome out to those of you who are clicking over from MADE to Celebrate the Boy. I'm so honored that Dana asked me to be a guest blogger.

As you can tell, I love my boys and I love them wearing these button-up shirts. Likewise, I'm excited to share this tutorial with you today.

Click here to enter the Boy's Collar Tutorial

Monday, February 1, 2010

Boys' Dress Pants


February is Celebrate the Boy month over at MADE and Made by Rae! And I have a little surprise... You just might see me hanging around at MADE in a few days... Something involving a little tutorial I'm doing. In the meantime I thought I'd blog this pair of pants I made last month. They fit with the Boy theme, don't you think?


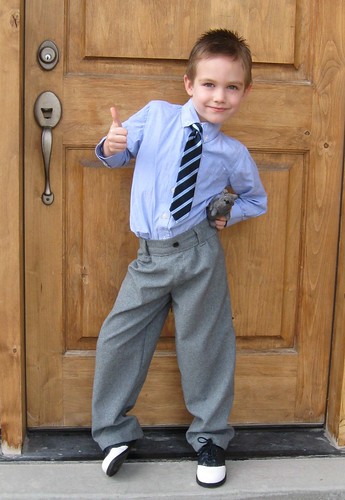
I call this kid Monkey, but I think he might be part giraffe. Monkey One recently went through another growth spurt. I had been meaning to sew him a new pair of dress pants for quite some time, as the hem of his old pants was creeping higher and higher up his ankles. I was making him wear his cowboy boots to church every week to hide the problem. One Saturday night I decided I couldn't take him to church one more time in those high-water pants. So at 9:45pm I dug into my fabric stash and started cutting. A few hours later I had these.


To keep things simple I left off the pockets. For the waistband I wanted a smooth front and an elastic back. But, as I always do, I started to complicate things: "Oh, it won't be too hard to add some pleats in the front" "I should just stitch around the front here to make it look like it has a fly" "I'll add this button on real quick just for looks" and so on. But in the end I was glad I added those complications and left off the pockets. The waistband took me longer than I thought it would. One of these days I'll keep that in mind while I'm budgeting my time.


As a pattern I used an old pair of dress pants I had made him for a wedding almost two years ago. Was it really that long ago? I can't remember what pants I used as a pattern for those. Since Monkey One only grows up and not out I kept the width almost the same, but made them six inches longer. Yes, you read that right. Six inches. (Please note that he has had other dress pants since that wedding. One pair he'd already outgrown. Another pair had been ruined in an incident with his female cousin involving pink nail polish, but he would have outgrown those, regardless. His other pair, which were almost too casual to wear to church in the first place--and were also seemingly shrinking--were in the laundry.)


The pants are just a tad too long. Can you see him stepping on the hem as he knocks on the door? But don't worry. I won't be surprised if he grows more and I have to let the hem down by July!

Monday, January 25, 2010

Xmas Gifts 6: Bean Bag Cubes


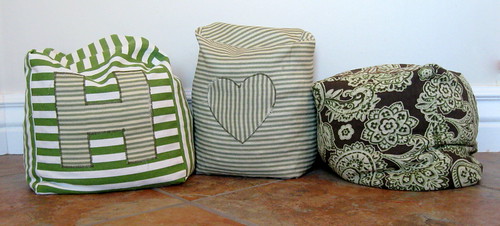
My husband enjoys laying on our family room floor. From there he reads, uses his laptop, and watches TV. He's always grabbing for something to prop up his head. But he doesn't use soft objects like a normal person would (no offense, Amore). I've seen him use books, VHS tapes, and remote controls (all standing on their ends) as pillow substitutes. I don't know, maybe it's a macho thing that he can't use anything fluffy? So for Christmas I made him some bean bag pillows to do the trick. The beans make them sturdy yet pliable, so he can shape them the way he wants. I made them in different sizes as well.


Actually, I didn't mean for them to turn out so big. I used up most of a 5-gallon bucket of pinto beans from our food storage, and still didn't have quite enough! I'm considering picking the bean bags apart to make them smaller because they are also quite heavy.


I made each bean bag out of fabric I already had on hand, fabric that I like, so that I wouldn't mind seeing them strewn all over the family room floor. I also put some appliquéd messages on them, though I suppose that's not very manly. The appliqués are already coming apart, so I obviously need more practice in that department.


The inspiration for these came from Paper and String's fun doorstops. And, although I only saw these after I had finished the bean bags, they also remind me of Dana's giant Rollie Pollie pillow, but only because (1) we both made some sort of pillows, (2) IKEA fabric was involved, and, (3) let's face it, I just adore her and want to be as cool as she is.

I still have one more Christmas gift to post, then on to some more fun (and more current) stuff.

Tuesday, January 19, 2010

Family Mailbox

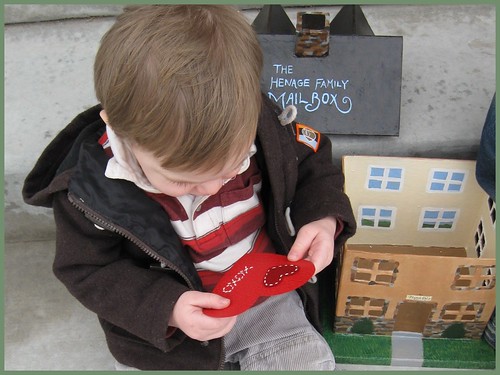
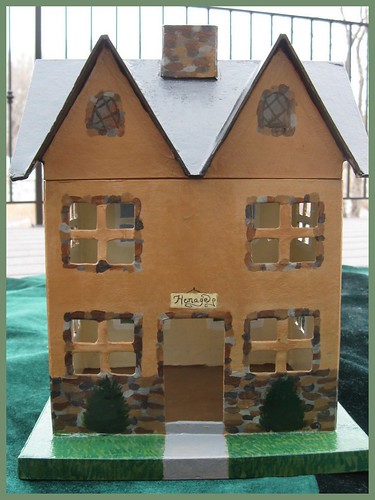
When I was little my mom made us an indoor family mailbox. It looked like a little cottage home with slots on the back for each family member. We sent each other notes and items we had ordered from each other's mail order catalogs throughout the year, but the busiest time for our family mailbox was Valentines Day. A few years ago I bought a paper mache house to make my own family mailbox. Since Valentines Day is right around the corner I thought now would be the perfect time to paint it.


I tried to make the coloring and style look a little like our own house. Wouldn't it also make a fun toy house to play with a little wooden peg family?


What's inside? Two Valentine cards!


I thought the house would be so cute photographed on our front lawn. Then I remembered that it's January and all we have is footprint-covered snow. I tried it on the snow, but the white washed all the color out of the pictures, and my little monkey wouldn't stop throwing snowballs at it. So the Christmas tree skirt and my front porch steps will have to suffice.


I was having a lot of fun painting the jasmine plant climbing up the side of the house. Then it suddenly reminded me of a Thomas Kinkade painting so I immediately had to stop. The other side has a birdhouse and agapanthus plants. Hmmmm... I wonder if it would work to paint flowers on the side of my real house to make it look like I have a garden. Do you think my neighbors would notice?


Here's the before picture. House purchased from Hobby Lobby.


My oldest little monkey and I have already exchanged several letters with each other using our new mailbox. A new (old) family tradition!

Friday, January 8, 2010

Xmas Gifts 5: Ashley Purse

My second vinyl purse attempt. This one is a little bigger. It's more like a slim diaper bag. In fact, I tried to make it the same dimensions as my Similac diaper bag from the hospital. I'm embarrassed to admit that. You know the one I'm talking about. It's really the perfect size bag. Ashley's bag is much cuter, though. I love the little bird on it.


I stitched along all the seams to help the purse keep its shape. I was a little disappointed at first because right up until the very last step it looked more like a messenger bag with its flap missing. Then I stitched those final outer seams along the top section and--voila!--the whole thing came together. I was pleased.


Isn't this the cutest little guy? I just want to toss him some bread crumbs.


Here's the lining. Recognize it? It's from IKEA. The little bird on the front of the purse is from this fabric. I love the little inner side pockets. They are perfect for keeping keys and chapstick handy.


Just as I was about to send this home with my brother to give to Ashley in California I realized I didn't have any pictures of the purse on a human. So here I am, modelling the purse at 11 o'clock at night while my brother snapped the picture for me. He actually paid me a huge complement: When he saw the purse he looked a little surprised, maybe even dumbfounded, and told me it looked like the kind of bag his friends would buy from some hip store. He's in with the cool, film student, artsy crowd, and I know nothing about cool, so I was very pleased to get the complement.
(In case you were wondering: The bracelet I'm wearing is one of the gifts my sister Ashley gave me for Christmas. My sister Bridey made me the knit hat for Christmas last year).

Thursday, January 7, 2010

Felt Snowflakes


My sister Ashley made these beautiful felt snowflakes for me for Christmas. The tutorial came from The Purl Bee. Aren't they exquisite? Ashley did a great job. I love them!

Tuesday, January 5, 2010

Xmas Gifts 4: Horse of a Different Color


Do you remember Rainbow Brite and her horse Starlite back from the '80s? I had both toys as a kid. Several years ago I got rid of the horse by giving it to one of my nieces. It recently turned up when my mom moved. Mom showed up on my doorstep all pleased that she had found it for me.

It was dirty.

And it had rainbow colored hair.

My youngest little monkey took to it immediately, tucking it under his arm and blowing raspberries (that's his horse impersonation). But as much as I love looking at rainbows in the sky, seeing one on a toy horse's mane in my son's arm was a little disturbing. I hated to throw it away and waste it, especially since the kid liked it so much. So a master plan began unfolding in my mind: I'd give the horse a makeover. I wouldn't be wasteful, it would be a fun challenge, my son would have a "new" toy horse for Christmas, and it would be cool to think that it was the toy that I once played with.


I covered the hoofs by sewing little caps of black stretch velvet and stretching them over the glue-covered old hoofs (FYI I used flexible fabric flue). Later, close to the end of the project, I hand-sewed the hoofs in place to the bottom of the newly covered legs.


I made small triangles for the ears, then hand stitched them in place around the base. The next step was the to cut out the body pieces of the gray velvety fabric to fit onto the horse. I used the seam lines from the original horse as a guide. I machine stitched the fabric for the horse's back from behind the ears to the tail, then pinned it in place. All the other pieces were first pinned (or rather stabbed) in place then hand stitched.


These pictures were taken at various wee and not-so-wee hours of the morning on Christmas Day while everyone was asleep. Jane Austen on the DVD player kept me company. It was almost dawn when I went to bed. The horse was still hairless and had pins sticking out in a few places, but I wrapped it and put it under the tree anyway, then finished it up later after it was unwrapped. A 19-month-old child doesn't know the difference, right? Just as long as he can open a present on Christmas morning?


I really would have like the horse to be brown, but I couldn't find the right fabric in the little time I had to look (It was a busy season). So the color gray had to do. The fabric is so soft. It's some sort of velvet, though I don't remember exactly what. The black hoofs are stretch velvet, and the mane and tail are simply yarn. I'm happy to say that my little monkey loves the horse. And now I do, too.


Saturday, January 2, 2010

Xmas Gifts 3: Melanie Purse

Inspired by the shape of a favorite purse I own, this purse was my first "big" project in vinyl (and by big I mean in size of the individual item, not in scope of the entire project). I found the vinyl difficult to work with because I couldn't get my machine into the little nooks and crannies at the bottom of the purse very well. Also, the thread was a mess. I adjusted the tension quite a bit, but in the end it seemed to be more luck than science. Other than those hiccups, I'm pleased with how cute the purse turned out. I think the flower/bow (inspired by the flower on my favorite flats) makes the purse, but I also love the green vinyl (from Design Company Fabrics) and the fun black and white Alexander Henry fabric (from JoAnn). This purse was for my sister-in-law, Melanie.


Friday, January 1, 2010

Xmas Gifts 2: Football Fan Blankets

My brother-in-law is a huge BYU football fan. So for Christmas I went in search of his team's fleece to make him and his 18-month-old son matching blankets. While I didn't find the right team fleece I did find this fabulous minky football fabric that is even better. I lined the back side with fleece for thickness and made my own logo on the front out of the same.


This blanket was for my nephew. It's about four feet, square.


Here's the blanket for my brother-in-law. It's about 6 feet long, maybe longer.


I only had to cut the "Y" out once. I used the reverse for the baby's blanket.


He looks pretty happy about the gift, don't you think?
Related Posts Plugin for WordPress, Blogger...