Friday, October 30, 2009

Ghosts of Halloweens Past

In honor of Halloween tomorrow, I thought I'd revisit some older costumes I've made. These ghosts keep reappearing every other year or so. You may have seen them in my Flickr photos. If they are haunting you here for the first time then I hope you enjoy.

The Ghosts of Tarzan, Jane, and Monkey


2005 - The Tarzan wig is made from fancy yarn. Marito was a good sport for wearing it. Also, that leafy thing is supposed to be a vine. When we walked into the Halloween party someone thought he was a tree! Tree, indeed. Hmmph. The Jane costume is so much fun to wear, but has so many pieces to it! There's a bustle pillow and a fluffy petticoat under that flounce in the back. Just in case you thought that was me. I just want to keep that clear.


2005 - Jane detail (this monkey costume was purchased).


I used this pattern for Jane. It is a very complicated costume, so I simplified it a bit and made it shorter like Jane's. I also made a puffy petticoat for fun.


2007 - Here we used the costumes again (we had moved to a different state, so these was new to everyone who saw us). This time Tarzan wore his costume leopard-side-out.


2007 - Here's the monkey costume I made.
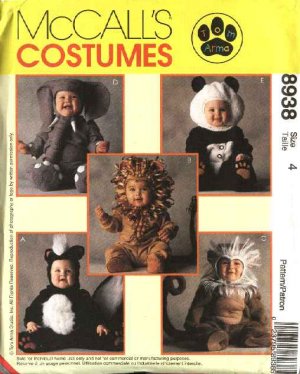

Here's the pattern I used. As you can see, I modified it for an older toddler (he's almost 3 years old here). I left off the obnoxious fringe.


2007 - He still frequently wears this costume around the house.


2007 - It's difficult to see in this picture, but there's a curly tail in the back. It's attached to the top. That fuzzy white part is just a camera thing.

Tuesday, October 27, 2009

Indian Family Peg People


I remembered to take these pictures before I put the finish on so there wouldn't be a glare. The woman's clothing is from a painting in a library book about Plains Indians. The little boys' clothing is from a costume pattern we are using to make real costumes for the boys.


My son and I made these as a homeschool activity. I keep finding them in his pants pockets. These would be fun to play with together with the Little House on the Prairie play people I made for my niece.

Tuesday, October 13, 2009

Olive Kitchen Set and New Look!

I love this Santorini olive fabric. I hope my mom does, too, because that's what she got for her birthday. I made her two hanging kitchen towels, and since I was having fun I made a couple of reversible hot pads. I have a little fabric left over, so I'm hoping to make some for myself, as well.

The little white ball trim came from (curtains? A bed spread?) something I got at the thrift store, which I bought only for the trim. As soon as I got home I pulled out my handy dandy seam ripper and yanked the trim off that ugly fabric. It's cute on the towel, don't you think?

And speaking of Jack the Seam Ripper... I fixed up my blog! I've had a makeover in the making for a few months. That's one reason I haven't been posting much. I couldn't decide on the many slightly varying versions I made of the header. Finally I decided just to pick one. It's much better than before. My amazing, wonderful, brilliant brother Will made the seam ripper for me. It turned out even cooler than I hoped or imagined. I'm sure I'll keep fixing up the layout as time goes by, but I'm just glad to have something new, fresh and cute for now.

(By the way, can anyone see the favicon? I'm having trouble with it, as it only seems to show up in Chrome on my own computer.)

On the left are some of the other headers I was considering. I almost chose the one with the green rick rack but in the end decided to go for the chosen frame for it's retro look. My "about me" picture looks a little freaky, but it's kind of fun, too. It's from a picture of me at my sister-in-law's wedding this summer. So now I need some feedback: Which header do you like best? Do you have any suggestions for my blog layout? Are you having trouble seeing the images? You love the pot holders and towels so much you want to go visit my mom this instant so you can see them in person?

Monday, October 12, 2009

Play Shoes

I'm on a shoes kick. Can you tell?


This little monkey desperately needed new play shoes, as his old ones had wholes the size of silver dollars in the toes. I think I've finally gotten down a good pattern and method for making these soft shoes. The key? Simplicity. I love them. I made these out of vinyl because I needed something more durable than the soft leather I used for his green and brown church shoes. This is marine-quality vinyl so water won't soak through it. Although the vinyl is not very breathable I'm hoping the vents on the sides will help with that.

Sunday, September 6, 2009

Soft Baby Saddle Shoes


Hurray! Success! I finished Monkey Two's saddle shoes.


Yes, you saw right. They are light green on brown. Fun! I snapped these pictures after church today, where the little squirt wore them for the first time.


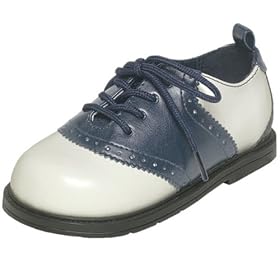
For inspiration I looked at some older leather and vinyl baby shoes we have and, of course, classic saddle shoes. Usually the "saddle" part of the shoe is darker, but I wanted the toes to be dark, since that part gets the most dirty and scuffed. I loosely used this pattern, but I had to resize it, with many attempts in paper and scrap fabric. The shoes are perhaps too wide in the toes, so I might take them in a bit. But better to have them too roomy than unbearably tight!


I made the shoes with some of the leather scraps I was telling you about before (purchased here). You can see I haven't trimmed the elastic on the inside yet. I want to make sure it's the right length first.


The next pair of shoes I make will be play shoes. I'd like to keep this somewhat nice for church.

Tuesday, September 1, 2009

Saddle Shoes, Take One


These shoes are made from soft vinyl, with cotton fabric lining (the banana fabric you saw a few posts ago) and leather soles.


Adorable, right? I intended to had some faux laces to the top, but I never got that far. Here's why: They are too small! I made a cloth sample one first that seemed to fit, but in the end it just didn't work out. Monkey Two wore them once, to church. They only fit on his cute chubby feet with a lot of trouble and without socks. Afterwards his poor little feet had such deep dents from the shoes that I knew they needed some serious reconstruction.

I added a little wedge to one, thinking that would do the trick. It helped some with the width/girth of his feet, but it was still a little too short. And his feet are only going to get bigger. So I think I'll just have to add the wedge to the other one too make them match, then pass them along to some other lucky little boy (who's a little younger). Monkey Three, perhaps? (No, I'm not making any announcements)


For the next pair I'm going to go all leather. I have mixed feelings about buying dead animals skins, but the leather came from remnant scraps so I somehow feel justified. The leather is more breathable and pliable than the vinyl. I think will be more comfortable for my guy's little feet.

"Why are you making shoes?" you may wonder. Monkey One had a couple pairs of leather Robeez that I LOVED. I like how the soft shoes let my kids feel their own feet as they walk, instead of trapping them into some stiff, bulky boxes. They are so simple, I always thought I could make my own (I've actually made more difficult shoes--two different pairs of vinyl baby/toddler cowboy boots--somewhat successfully). I like the challenge of figuring out how to make something and customizing it to the way I want it. Plus, I got enough leather scraps to make several pairs of shoes, all for 1/3 of the price of one pair of Robeez!

Today I traced a larger pattern piece and cut out another cloth sample. So look forward to a (hopefully more successfully-fitting) new pair of adorable saddle shoes in the next week or two.

Thursday, August 13, 2009

Sneak Peaks

If the blog has been idle for a bit that probably means I've been working on something. Here's a little fabric swatch teaser on what I've been working on:

I love this David Walker Oh Boy! fabric I bought it at Material Girls. So cute, huh? Wouldn't the vehicle silhouettes make a cute car seat cover? That's not what I'm using it for, but I'm considering it for a near-in-the-future project. The animal silhouettes I actually bought in red/orange (darker than the orange/yellow), but I may have bought the green if they carried had it.


Another project? Yes. Let's just say it involves tan and brown vinyl, brown leather, some heavy thread and needles, a little elastic, a hint of this banana fabric, and a lot of readjusting and making over. Yes, I usually overcomplicate things. You'll see. Soon.

These JoAnn bananas are cute, don't you think? My little monkeys will eat them up.

Saturday, August 1, 2009

Adventure Log Coloring Rolls

In a sudden burst of energy the night before we left for Yellowstone I decided to make my little monkey boys colored pencil/crayon rolls and mini adventure logs for our trip. I'm so glad I did because they both LOVE them!

Monkey One's is made from a placemat (I got the idea from one Amy made for my sister). I had all the supplies on hand, as I'd been planning on making one for awhile. So it wasn't hard to just grab my stuff and whip it together. Monkey One's favorite color is green, so I gave him the most colored pencils in that color. It's amazing what new life a pencil sharpener and some organization in a nifty carrier will do for old colored pencils! And what a fun journal will do for a family vacation.


I love this Amy Butler scrapbook paper. Again, lots of green. This book is about 6 inches tall and 5 1/2 inches wide. I just took six or seven pieces of plain paper, trimmed them down to about six inches, and stitched them together down the middle with the scrapbook paper on the bottom, then folded them in half to form the book. After that I colored the title and sewed it onto the front. Remember, this was all on a whim very late at night when I was on some sort of creative high. Maybe I should stay up later more often?


Here's a sample page of the finished product. There are a few pages of simple animal silhouettes printed from the Internet for him to circle as he spotted them at Yellowstone. When we got home we printed photos of our trip and glued them in the empty spots (but there weren't many!).


Monkey Two's crayon roll is made from robin's egg colored wool felt (also on hand). The book is about 3 inches square. I knew I had to make a crayon roll for Monkey Two to accompany his brother's colored pencil roll when I recently read Amanda Blake Soule's wonderful book The Creative Family. Anyway, I realized I forgot to take a picture of the crayon roll when it still looked bright and new, filled with a rainbow of newish crayons. Now the crayons are--who knows where?--probably all stuffed down the vents.


Here's a sample page from Monkey Two's adventure log. In the photo we are watching some elk in a field. Both monkeys have their coloring rolls out. They love them! And it made the trip extra special.

For a more exhaustive extensive look at what went inside the adventure logs, take a look at my personal family blog.

Buffalo Patch Tee #2


I finished Monkey Two's buffalo shirt the day after the first one. Notice the buffalo is facing the other way? I also added a zig-zag stitch to the hem and sleeves. I made the process of this one much simpler, but messier. Instead of sewing the buffalo to the inside of the shirt and cutting away the t-shirt, I made the buffalo separate, then sewed it into the shirt. This made the furry fleece go all over the place. Maybe there's a compromise for the next time (if there is a next time!).

I really enjoy trying out new things, making it up as I go along.
Related Posts Plugin for WordPress, Blogger...